


How to Empty the Recycle Bin When Shutting Down Your Computer
By Timothy Tibbettson 06/15/2023 |
The Windows Recycle bin exists to allow you to restore recently deleted files. We don't use the Recycle Bin and prefer to save space and keep it empty if you're like us. Since we both reboot and empty the recycle bin about once a week, why not delete the recycle bin when we reboot? Here's how to empty the recycle bin on every reboot.
Windows 10 & 11 Home does not have Group Policy Editor, but you can manually Enable Group Policy Editor in Windows 10 Home Edition.
For advanced users to speed through this guide, we're merely going to create a batch file, then use Group Policy Editor to execute it at shut down. Optionally, here's a step-by-step video on how to.
1: Create a Batch File
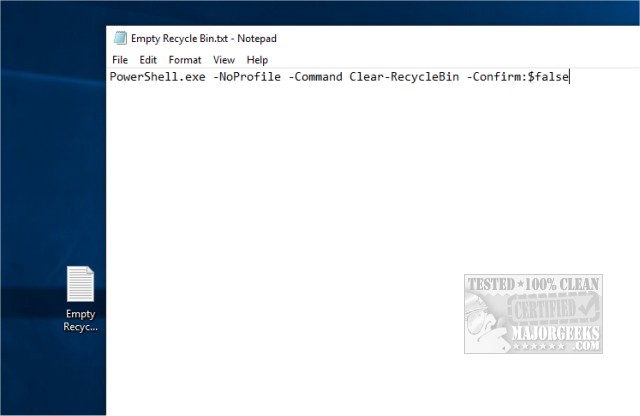
Right-click on your Desktop and select New > Text Document (or open any text editor) to create a new text file. We're calling ours Empty Recycle Bin.
Copy and paste PowerShell.exe -NoProfile -Command Clear-RecycleBin -Confirm:$false into the text document and save it.
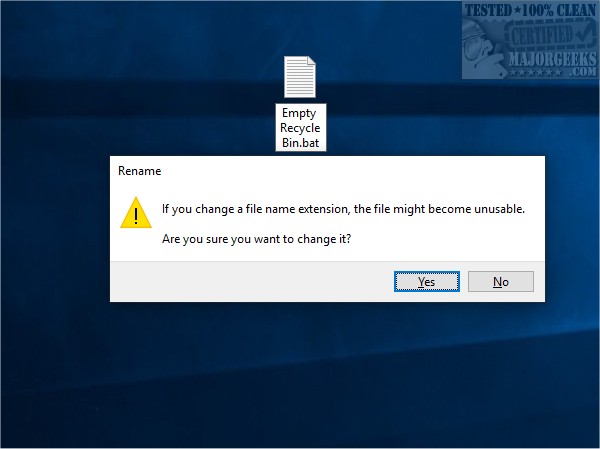
Next, rename your text file to .bat. Click on it and replace .txt with .bat. If you don't see .txt, in File Explorer, go to View and check the box next to View file name extensions.
You should now be sure you save or move your batch file anywhere you like, so you know where it is for the next step.
Before you proceed, let's make sure your new batch file works. Make sure you have deleted files in your Recycle Bin and double-click your new batch file. If the Recycle Bin empties, we're ready to proceed.
2: Create a New Group Policy
Now, let's use Group Policy Editor to execute your new batch file at every reboot.
Press the Windows Key + R and type in gpedit.msc and press Enter.
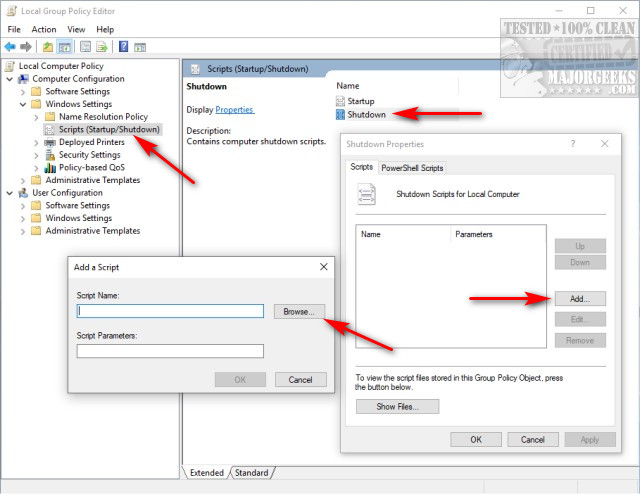
Navigate to Computer Configuration > Windows Settings > Scripts (Startup/Shutdown)
Right-click on Shutdown and click on Properties. Click on Add, then browse to your new batch file, select it and click on OK, then click on OK again.
Shut down, or reboot to verify it works.
If you change your mind later, delete the batch file and follow the above steps, except when you click on Properties, you can select and click on Remove the batch file.

Similar:
How to Hide the Recycle Bin in Windows 11, 10, 8, & 7
6 Ways to Empty the Recycle Bin in Windows 10 & 11
Enable or Disable the Recycle Bin Delete Confirmation Box
How to Permanently Delete Files Instead of Using the Recycle Bin
How to Change the Recycle Bin Icon in Windows 10 & 11
comments powered by Disqus
Windows 10 & 11 Home does not have Group Policy Editor, but you can manually Enable Group Policy Editor in Windows 10 Home Edition.
For advanced users to speed through this guide, we're merely going to create a batch file, then use Group Policy Editor to execute it at shut down. Optionally, here's a step-by-step video on how to.
1: Create a Batch File
Right-click on your Desktop and select New > Text Document (or open any text editor) to create a new text file. We're calling ours Empty Recycle Bin.
Copy and paste PowerShell.exe -NoProfile -Command Clear-RecycleBin -Confirm:$false into the text document and save it.
Next, rename your text file to .bat. Click on it and replace .txt with .bat. If you don't see .txt, in File Explorer, go to View and check the box next to View file name extensions.
You should now be sure you save or move your batch file anywhere you like, so you know where it is for the next step.
Before you proceed, let's make sure your new batch file works. Make sure you have deleted files in your Recycle Bin and double-click your new batch file. If the Recycle Bin empties, we're ready to proceed.
2: Create a New Group Policy
Now, let's use Group Policy Editor to execute your new batch file at every reboot.
Press the Windows Key + R and type in gpedit.msc and press Enter.
Navigate to Computer Configuration > Windows Settings > Scripts (Startup/Shutdown)
Right-click on Shutdown and click on Properties. Click on Add, then browse to your new batch file, select it and click on OK, then click on OK again.
Shut down, or reboot to verify it works.
If you change your mind later, delete the batch file and follow the above steps, except when you click on Properties, you can select and click on Remove the batch file.
Similar:
comments powered by Disqus
