


How to Enable or Disable USB Write Protection
By Timothy Tibbettson 06/15/2023 |
USB Write Protection or USB Write Access allows you to protect the data on your thumb or flash drives. You can manually enable write-protection or use the registry. We call these two methods, hardware or software.
Using the hardware method is simple and perfect if you need to enable or disable write protection occasionally while the registry method is ideal for protecting your data every time.
Enable or Disable USB Write Protection (Hardware)
Manually enabling or disabling write protection requires you to locate a switch physically on the USB drive, similar to how we used to disable write protection on floppy disks (showing our age).
Look on the drive for that switch. For example:

Enable or Disable USB Write Protection (Software)
We can enable or disable write protection in the registry.
Because multiple steps are required, we have created the registry files for you.
Download Enable or Disable USB Write Protection and extract the two files.
Double-click Enable USB Write Protection.reg or Disable USB Write Protection.reg (Default) to Enable or Disable USB Write Protection.
Click Yes when prompted by User Account Control.
Click Yes when prompted by Registry Editor.
Click OK when prompted by the Registry Editor.
This tweak is included as part of MajorGeeks Windows Tweaks.
For advanced users, here are the steps you can take.
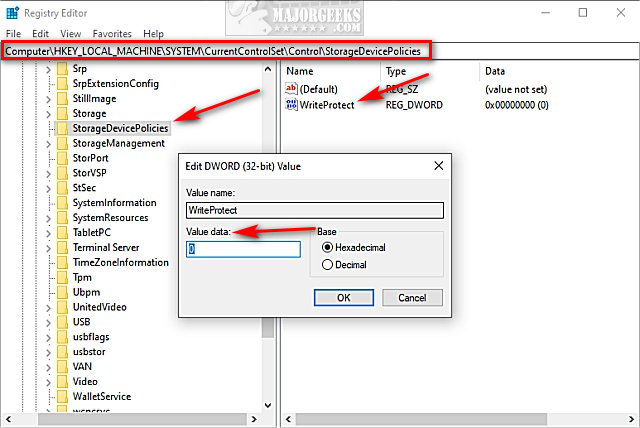
Registry:
Go to HKEY_LOCAL_MACHINE\SYSTEM\CurrentControlSet\Control.
Create a new key named StorageDevicePolicies.
Right-click and create a New > DWORD (32-bit) Value named WriteProtect.
Set the Value data to 1 to enable write protection or 2 to disable write protection (Default).
Similar:
How to Optimize USB Drives for Better Performance
How to Show or Hide the Safely Remove Hardware Icon
What Is an SS USB Port?
How to Diagnose USB Problems
USB Port Remains Active After Using Safely Remove Hardware
comments powered by Disqus
Using the hardware method is simple and perfect if you need to enable or disable write protection occasionally while the registry method is ideal for protecting your data every time.
Enable or Disable USB Write Protection (Hardware)
Manually enabling or disabling write protection requires you to locate a switch physically on the USB drive, similar to how we used to disable write protection on floppy disks (showing our age).
Look on the drive for that switch. For example:
Enable or Disable USB Write Protection (Software)
We can enable or disable write protection in the registry.
Because multiple steps are required, we have created the registry files for you.
Download Enable or Disable USB Write Protection and extract the two files.
Double-click Enable USB Write Protection.reg or Disable USB Write Protection.reg (Default) to Enable or Disable USB Write Protection.
Click Yes when prompted by User Account Control.
Click Yes when prompted by Registry Editor.
Click OK when prompted by the Registry Editor.
This tweak is included as part of MajorGeeks Windows Tweaks.
For advanced users, here are the steps you can take.
Registry:
Go to HKEY_LOCAL_MACHINE\SYSTEM\CurrentControlSet\Control.
Create a new key named StorageDevicePolicies.
Right-click and create a New > DWORD (32-bit) Value named WriteProtect.
Set the Value data to 1 to enable write protection or 2 to disable write protection (Default).
Similar:
comments powered by Disqus
