


How to Format and Partition a Drive With PowerShell
By Timothy Tibbettson 06/30/2023 |
While you can use File Explorer to format a drive in Windows, you can also use PowerShell if you're having issues with File Explorer or Windows Explorer.
Consider cleaning out junk files and defragmenting your hard drive to speed up and optimize the process.
If you're running low on hard drive space, there's never been a better and more affordable way to speed up your computer like an SSD hard drive, especially when you consider your hard drive is the biggest bottleneck in your computer. We prefer Western Digital SSD because they come with the easiest to use migration software even for the computer amateur. Links provided here are affiliate links, and we may earn a commission if you purchase using our links.
For our example, we will be formatting an external thumb drive. You will need to identify the drive you want to format correctly, and then we will give you the PowerShell commands.
Open PowerShell as admin and type in get-disk.
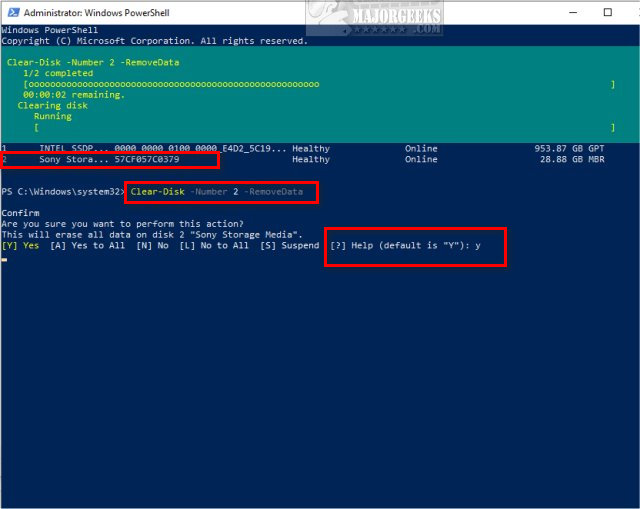
You will see a list of drives with a Number next to the Friendly Name. Our thumb drive can be identified as 2, the number we need to know going forward.

To format the drive type in Clear-Disk -Number X -RemoveData replacing X with your drive number.
Click Y and press Enter to erase the drive. You will see a splash screen and return to an empty line in Powershell when completed.
To create a new partition use New-Partition -DiskNumber X -UseMaximumSize -IsActive -DriveLetter Y replacing X with your drive number and Y with the drive letter you want to assign to the drive.
Sometimes that command will return an error. If so, try Format-Volume -DriveLetter X -FileSystem FAT32 -NewFileSystemLabel USB replacing X with your drive number. You can also change the volume FAT32 to NTFS.
Similar:
Western Digital SSD Drives at Amazon.
Do I Need to Format My Hard Drive When Doing a Fresh Install of Windows?
How to Format and Partition a Drive With PowerShell
How to Erase a Disk Using Diskpart Clean Command in Windows
GPT (GUID Partition Table) or MBR (Master Boot Record) When Partitioning a Drive?
Safely Convert Your Master Boot Record (MBR) to GUID Partition Table (GPT) with MBR2GPT.EXE
Windows 10 Creates an Extra Disk Partition
comments powered by Disqus
Consider cleaning out junk files and defragmenting your hard drive to speed up and optimize the process.
If you're running low on hard drive space, there's never been a better and more affordable way to speed up your computer like an SSD hard drive, especially when you consider your hard drive is the biggest bottleneck in your computer. We prefer Western Digital SSD because they come with the easiest to use migration software even for the computer amateur. Links provided here are affiliate links, and we may earn a commission if you purchase using our links.
For our example, we will be formatting an external thumb drive. You will need to identify the drive you want to format correctly, and then we will give you the PowerShell commands.
Open PowerShell as admin and type in get-disk.
You will see a list of drives with a Number next to the Friendly Name. Our thumb drive can be identified as 2, the number we need to know going forward.
To format the drive type in Clear-Disk -Number X -RemoveData replacing X with your drive number.
Click Y and press Enter to erase the drive. You will see a splash screen and return to an empty line in Powershell when completed.
To create a new partition use New-Partition -DiskNumber X -UseMaximumSize -IsActive -DriveLetter Y replacing X with your drive number and Y with the drive letter you want to assign to the drive.
Sometimes that command will return an error. If so, try Format-Volume -DriveLetter X -FileSystem FAT32 -NewFileSystemLabel USB replacing X with your drive number. You can also change the volume FAT32 to NTFS.
Similar:
comments powered by Disqus
