


How to Scan and Repair a Single File Using System File Checker
By Timothy Tibbettson 06/15/2023 |
The System File Checker or SFC is built into Windows and can scan for, then repair or replace corrupted system files. SFC is a handy tool to fix a lot of problems. Typically, when you use System File Checker, you scan every file on your computer. If you know what file is causing the problem, you can save time by scanning just the one file you suspect is causing the problem. Here's how.
Open the Command Prompt or PowerShell as admin.
1: Deployment Image Servicing and Management (DISM)
Deployment Image Servicing and Management (DISM) tool is often a requirement (Windows 10) before running System File Checker. DISM will use Windows Update to provide any files that are needed to fix corruption. If you skip this step, System File Checker might not work.
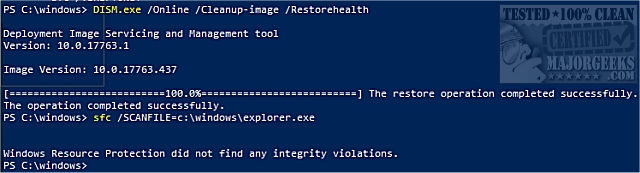
Type in DISM.exe /Online /Cleanup-image /Restorehealth and press enter. This may take five minutes or more.
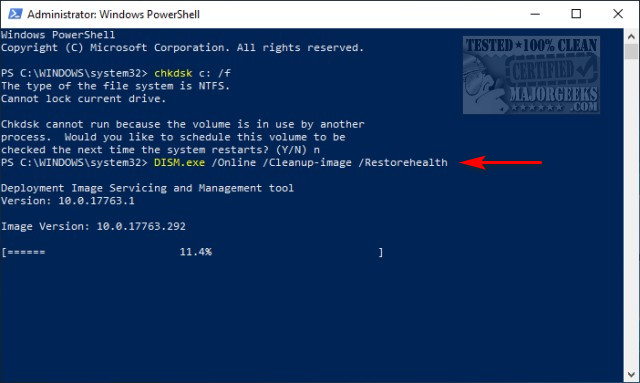
Next, type in the following three lines and press enter after each. When completed, reboot. The first step is quick, and the second and third steps could take some time.
Now see if System File Checker works. If not, you'll need to type in the following three lines, one at a time, then reboot.
Dism /Online /Cleanup-Image /CheckHealth
Dism /Online /Cleanup-Image /ScanHealth
Dism /Online /Cleanup-Image /RestoreHealth
2: System File Checker (SFC)
Type in sfc /SCANFILE=C:\PathToTheFile.
You can expect to see one of two messages:
Windows Resource Protection did not find any integrity violations.
or
Windows Resource Protection found corrupt files and successfully repaired them.
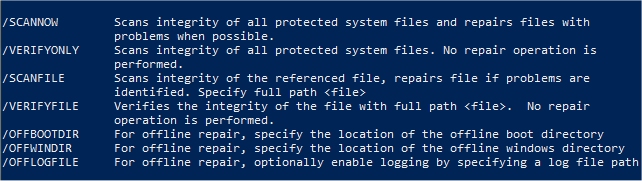
You may receive different errors so you'll want to be familiar with the available switches:
If you receive an error that says Windows Resource Protection could not perform the requested operation, that means Windows is protecting the file, or you didn't run DISM. In this situation, you'll want to run DISM or boot into Safe Mode and run System File Checker from there.
Similar:
How to Scan and Repair a Single File Using System File Checker
How to Add System File Checker Context Menu in Windows
How to Check Your Hard Disk Health Using WMIC
How to Fix File System Errors in Windows
comments powered by Disqus
Open the Command Prompt or PowerShell as admin.
1: Deployment Image Servicing and Management (DISM)
Deployment Image Servicing and Management (DISM) tool is often a requirement (Windows 10) before running System File Checker. DISM will use Windows Update to provide any files that are needed to fix corruption. If you skip this step, System File Checker might not work.
Type in DISM.exe /Online /Cleanup-image /Restorehealth and press enter. This may take five minutes or more.
Next, type in the following three lines and press enter after each. When completed, reboot. The first step is quick, and the second and third steps could take some time.
Now see if System File Checker works. If not, you'll need to type in the following three lines, one at a time, then reboot.
Dism /Online /Cleanup-Image /CheckHealth
Dism /Online /Cleanup-Image /ScanHealth
Dism /Online /Cleanup-Image /RestoreHealth
2: System File Checker (SFC)
Type in sfc /SCANFILE=C:\PathToTheFile.
You can expect to see one of two messages:
Windows Resource Protection did not find any integrity violations.
or
Windows Resource Protection found corrupt files and successfully repaired them.
You may receive different errors so you'll want to be familiar with the available switches:
If you receive an error that says Windows Resource Protection could not perform the requested operation, that means Windows is protecting the file, or you didn't run DISM. In this situation, you'll want to run DISM or boot into Safe Mode and run System File Checker from there.
Similar:
comments powered by Disqus
