


How to Properly Use Microsoft System File Checker in Windows 11 and 10
By Timothy Tibbettson 02/26/2024 |
System File Checker, or SFC, is a tool that can scan and repair corrupted or missing system files built into Windows. By repairing files, SFC can help fix various problems, such as Windows crashes, errors, or functions not working properly. It is often used and recommended by techs and advanced users and is relatively simple to use, although usually incorrectly. Here's all you need to know to use System File Checker or SFC properly.
1: Getting Started
Windows 11, 10, 8.1, or 8 users will need to first run the Deployment Image Servicing and Management (DISM) tool before running the System File Checker. DISM will use Windows Update to provide any files that are needed to fix corruption. If you skip this step, System File Checker might not work. And by might, we mean like 90% of the time, so don't skip this step. Windows 7 and Vista users can skip this step.
You will need to first open the Command Prompt or PowerShell as administrator.
Type in DISM.exe /Online /Cleanup-image /Restorehealth and press enter. This may take a few minutes.
Now if, for some reason, DISM doesn't work properly or you get an error message, it is likely your local cached copy of Windows files is corrupt, and you will need to grab a copy of Windows online to get all the correct system files. This is easy - but it takes a few minutes.
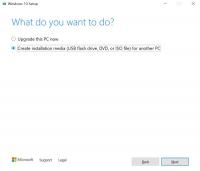
You will first need to download the Microsoft Windows Media Creation Tool. Pick the download for the Operating system you are running (Windows 10 or 11) and run the EXE.
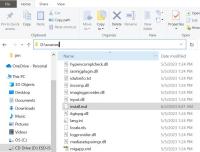
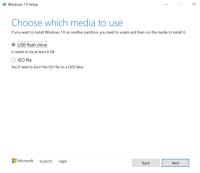
Pick the option that says 'Create Installation Media.' You then will receive a prompt to choose the media type - USB or ISO. The USB version will download files to be unpacked onto a USB drive. The ISO file is an already packed exact copy of the installed DVD you can mount as a virtual drive. Pick the one you are most comfortable with. The important part is to know where the files will be. In this case, we chose ISO and mounted it as a D: drive. We are looking for a file called install.esd or install.win (depending) in the sources directory. We want to know the path to that file. In this case, the path is d:\sources\install.esd We now will go back to our Command Prompt and amend our command to this:
DISM /Online /Cleanup-Image /RestoreHealth /Source:D:\Sources\install.esd
This will refresh the cached files from your newly download copy of Windows as well as any downloaded Windows update files.
If, for some reason, you do NOT want to use the Windows update files, add the switch / limitaccess like this:
DISM /Online /Cleanup-Image /RestoreHealth /Source:D:\Sources\install.esd /limitaccess
If all that is too much for you to type, check out DISM++, which is a free Graphical Interface to DISM. It can make your life easier.
2: Running System File Checker
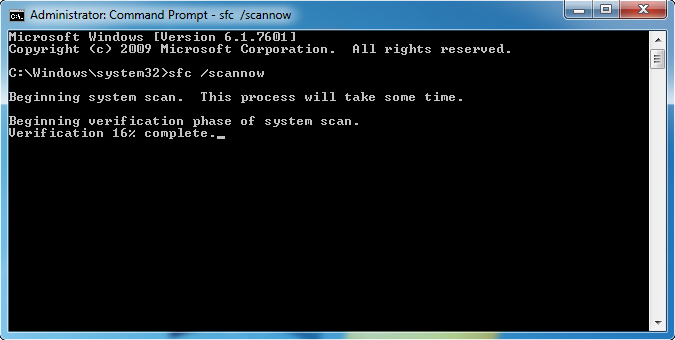
All you need to do is type in sfc /scannow and press the Enter key.
System File Checker will now scan for and replace files from the Windows cache, typically located at C:\Windows\System32\dllcache.
Once completed, you should see one of four possible results:
Windows Resource Protection did not find any integrity violations - You should be good to go as no issues were found.
Windows Resource Protection could not perform the requested operation - Run SFC from safe mode and also verify PendingDeletes, and PendingRenames folders exist under C:\WinSxSTemp
Windows Resource Protection found corrupt files and successfully repaired them - Problems were found and fixed. Microsoft has a page here to show you how to view details.
Windows Resource Protection found corrupt files but could not fix some of them; Odds are the file couldn't be replaced, and you'll need to manually. Scroll back up to see how to view the log file to locate the file in question.
A reboot will be required, and you're done.
3: Viewing Your Results
You can find the log file for System File Checker in C:WindowsLogsCBSCBS.log. However, life is rarely that easy. You need to again open the Command Prompt or PowerShell as administrator and type in findstr /c:"[SR]" %windir%\Logs\CBS\CBS.log >"%userprofile%\Desktop\sfcdetails.txt. (Thanks Some Dude That Codes)
This command will place sfcdetails.txt on your Desktop. Look for the date you ran the System File Checker, and you can see what it did. The log file is a bit of a scrambled mess, yet not too hard to decipher once you find the date you ran SFC. Typically, you're looking for what wasn't repaired so you can further troubleshoot your problem.
How-to Use Disk Error Checking
Similar:
How to Add System File Checker Context Menu in Windows
How to Check Your Hard Disk Health Using WMIC
How to Fix File System Errors in Windows
Should You Try and Fix Your Own Computer?
Windows 10 Problems You Can Fix Yourself With Included Troubleshooters
comments powered by Disqus
1: Getting Started
Windows 11, 10, 8.1, or 8 users will need to first run the Deployment Image Servicing and Management (DISM) tool before running the System File Checker. DISM will use Windows Update to provide any files that are needed to fix corruption. If you skip this step, System File Checker might not work. And by might, we mean like 90% of the time, so don't skip this step. Windows 7 and Vista users can skip this step.
You will need to first open the Command Prompt or PowerShell as administrator.
Type in DISM.exe /Online /Cleanup-image /Restorehealth and press enter. This may take a few minutes.
Now if, for some reason, DISM doesn't work properly or you get an error message, it is likely your local cached copy of Windows files is corrupt, and you will need to grab a copy of Windows online to get all the correct system files. This is easy - but it takes a few minutes.
You will first need to download the Microsoft Windows Media Creation Tool. Pick the download for the Operating system you are running (Windows 10 or 11) and run the EXE.
Pick the option that says 'Create Installation Media.' You then will receive a prompt to choose the media type - USB or ISO. The USB version will download files to be unpacked onto a USB drive. The ISO file is an already packed exact copy of the installed DVD you can mount as a virtual drive. Pick the one you are most comfortable with. The important part is to know where the files will be. In this case, we chose ISO and mounted it as a D: drive. We are looking for a file called install.esd or install.win (depending) in the sources directory. We want to know the path to that file. In this case, the path is d:\sources\install.esd We now will go back to our Command Prompt and amend our command to this:
DISM /Online /Cleanup-Image /RestoreHealth /Source:D:\Sources\install.esd
This will refresh the cached files from your newly download copy of Windows as well as any downloaded Windows update files.
If, for some reason, you do NOT want to use the Windows update files, add the switch / limitaccess like this:
DISM /Online /Cleanup-Image /RestoreHealth /Source:D:\Sources\install.esd /limitaccess
If all that is too much for you to type, check out DISM++, which is a free Graphical Interface to DISM. It can make your life easier.
2: Running System File Checker
All you need to do is type in sfc /scannow and press the Enter key.
System File Checker will now scan for and replace files from the Windows cache, typically located at C:\Windows\System32\dllcache.
Once completed, you should see one of four possible results:
A reboot will be required, and you're done.
3: Viewing Your Results
You can find the log file for System File Checker in C:WindowsLogsCBSCBS.log. However, life is rarely that easy. You need to again open the Command Prompt or PowerShell as administrator and type in findstr /c:"[SR]" %windir%\Logs\CBS\CBS.log >"%userprofile%\Desktop\sfcdetails.txt. (Thanks Some Dude That Codes)
This command will place sfcdetails.txt on your Desktop. Look for the date you ran the System File Checker, and you can see what it did. The log file is a bit of a scrambled mess, yet not too hard to decipher once you find the date you ran SFC. Typically, you're looking for what wasn't repaired so you can further troubleshoot your problem.
How-to Use Disk Error Checking
Similar:
comments powered by Disqus
(Updated 6/2/23: added DSIM switches and corrected the log file path statement)
