


PowerCFG Unexpected Error Condition Has Occurred
By Timothy Tibbettson 06/16/2023 |
PowerCFG is a command-line utility that first appeared on Windows XP that gives advanced users access to all configurable power system settings including many options you won't find in the Control Panel or Settings. Occasionally, one might run into an error that reads "An unexpected error condition has occurred. Unable to perform operation. You may not have permission to perform this operation."
There are a few possible reasons for this error, and here are the known solutions.
1: Check Diagnostic Policy Service Status
Press the Windows Key + R and type in services.msc.
Scroll down to Diagnostic Policy Service Status and verify the Status is Running.
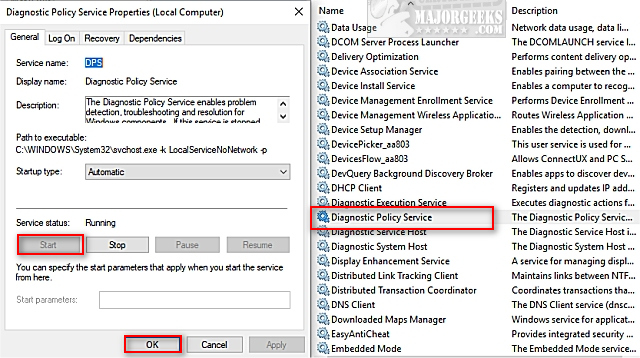
If not, double-click on Diagnostic Policy Service, click on Start and then click on OK.
2: Restore Default Power Settings
Open a Command Prompt or PowerShell as admin and type in:
powercfg -restoredefaultschemes
Reboot or log out and log back in.
3: Activate the Hidden Super Administrator Account
We can enable the Hidden Super Administrator Account from the Local Security Policy or the Command Prompt.
Local Security Policy
Local Security Policy is easier to use if you can. Press the Windows Key + R and type in secpol.msc to open Local Security Policy. Navigate to Local Policies - Security Options. The top setting should be Accounts:Administrator Account. Right-click and select properties or double-click on Accounts:Administrator Account. Change Disabled to Enabled.
[fullimage=635]
Command Prompt
Open your Command Prompt or PowerShell as administrator.
Type in the following to enable:
Enable: Net user administrator /active:yes
When completed type in the following to disable again:
Disable: Net user administrator /active:no
Both entries require you enter a second line with your password:
Password: Net user administrator YourPassword
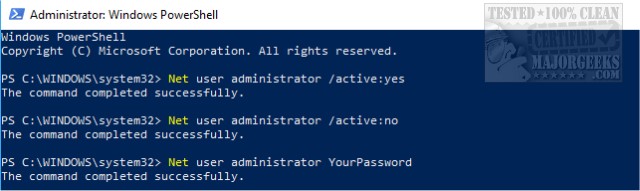
You will see The command completed successfully after entering any one of these commands if successful.
4: Run System File Checker
Windows 10, Windows 8.1 or Windows 8 users will need to first run the Deployment Image Servicing and Management (DISM) tool before running the System File Checker. DISM will use Windows Update to provide any files that are needed to fix corruptions. If you skip this step, System File Checker might not work. Windows 7 and Vista users can skip this step.
You will need to first open the Command Prompt or PowerShell as administrator.
Type in DISM.exe /Online /Cleanup-image /Restorehealth and press enter. This may take a few minutes.
Running System File Checker
All you need to do is type in sfc /scannow and press the Enter key.
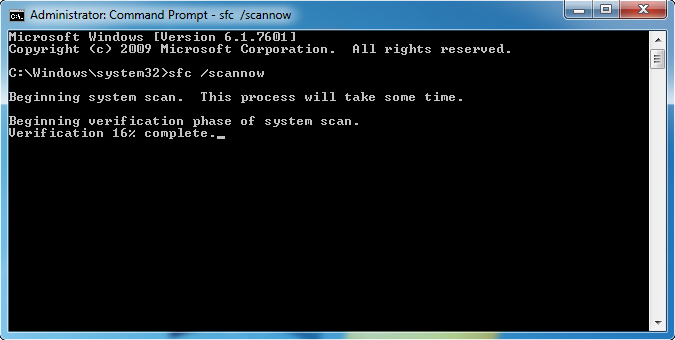
System File Checker will now scan for and replace files from the Windows cache, typically located at C:WindowsSystem32dllcache.
5: Boot Into Safe Mode
Driver or software problems could cause this error. Reboot and hold the F8 key to get to Safe Mode. If F8 fails, see How to Boot Into Safe Mode.
Similar:
The Ultimate List of Every Known Powercfg Command
Sleep, Hibernate or Shut Down Your PC?
Diagnose Power or Battery Issues with Power Efficiency Diagnostic Report Tool
Windows 10 Computer Won’t Boot After Power Outage
comments powered by Disqus
There are a few possible reasons for this error, and here are the known solutions.
1: Check Diagnostic Policy Service Status
Press the Windows Key + R and type in services.msc.
Scroll down to Diagnostic Policy Service Status and verify the Status is Running.
If not, double-click on Diagnostic Policy Service, click on Start and then click on OK.
2: Restore Default Power Settings
Open a Command Prompt or PowerShell as admin and type in:
powercfg -restoredefaultschemes
Reboot or log out and log back in.
3: Activate the Hidden Super Administrator Account
We can enable the Hidden Super Administrator Account from the Local Security Policy or the Command Prompt.
Local Security Policy
Local Security Policy is easier to use if you can. Press the Windows Key + R and type in secpol.msc to open Local Security Policy. Navigate to Local Policies - Security Options. The top setting should be Accounts:Administrator Account. Right-click and select properties or double-click on Accounts:Administrator Account. Change Disabled to Enabled.
Command Prompt
Open your Command Prompt or PowerShell as administrator.
Type in the following to enable:
Enable: Net user administrator /active:yes
When completed type in the following to disable again:
Disable: Net user administrator /active:no
Both entries require you enter a second line with your password:
Password: Net user administrator YourPassword
You will see The command completed successfully after entering any one of these commands if successful.
4: Run System File Checker
Windows 10, Windows 8.1 or Windows 8 users will need to first run the Deployment Image Servicing and Management (DISM) tool before running the System File Checker. DISM will use Windows Update to provide any files that are needed to fix corruptions. If you skip this step, System File Checker might not work. Windows 7 and Vista users can skip this step.
You will need to first open the Command Prompt or PowerShell as administrator.
Type in DISM.exe /Online /Cleanup-image /Restorehealth and press enter. This may take a few minutes.
Running System File Checker
All you need to do is type in sfc /scannow and press the Enter key.
System File Checker will now scan for and replace files from the Windows cache, typically located at C:WindowsSystem32dllcache.
5: Boot Into Safe Mode
Driver or software problems could cause this error. Reboot and hold the F8 key to get to Safe Mode. If F8 fails, see How to Boot Into Safe Mode.
Similar:
The Ultimate List of Every Known Powercfg Command
Sleep, Hibernate or Shut Down Your PC?
Diagnose Power or Battery Issues with Power Efficiency Diagnostic Report Tool
Windows 10 Computer Won’t Boot After Power Outage
comments powered by Disqus
