


How to Uninstall Programs With PowerShell or Command Prompt in Windows 10 & 11
By Timothy Tibbettson 06/23/2023 |
There are numerous ways to uninstall a program, and using the Command Prompt or PowerShell is one option.
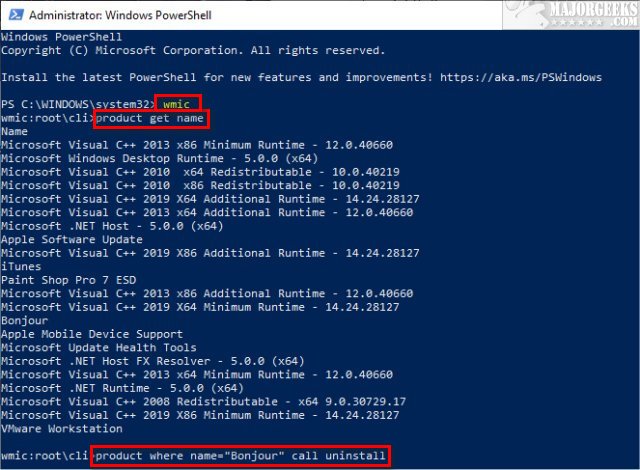
Open either the Command Prompt of PowerShell as Administrator.
Type in wmic and press Enter.
Next, let's get a list of installed programs by typing in product get name, and press Enter. The list might take a minute to appear.
To uninstall the program, use the following code replacing PROGRAM NAME with the program's name in quotes.
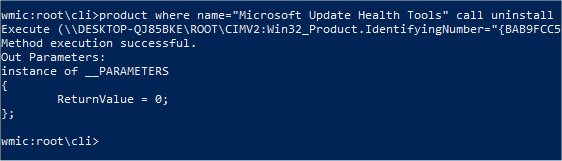
product where name="PROGRAM NAME" call uninstall
Press Y, then press Enter when prompted.
When completed, you will see Method execution successful.
You can confirm that the program is uninstalled by typing in product get name again.
Similar:
How To Uninstall Programs
How to Reset Windows Store Apps in Windows 10
Remove Windows 10, 8 and 8.1 Built-In Apps Using PowerShell
How to Uninstall Programs Not Listed in Control Panel
How to Manually Remove Program Entries from the Apps & Features List
comments powered by Disqus
Open either the Command Prompt of PowerShell as Administrator.
Type in wmic and press Enter.
Next, let's get a list of installed programs by typing in product get name, and press Enter. The list might take a minute to appear.
To uninstall the program, use the following code replacing PROGRAM NAME with the program's name in quotes.
product where name="PROGRAM NAME" call uninstall
Press Y, then press Enter when prompted.
When completed, you will see Method execution successful.
You can confirm that the program is uninstalled by typing in product get name again.
Similar:
comments powered by Disqus
