


How to Create Bootable Windows Installation Media For Windows 11, 10, 8, and 7
By Timothy Tibbettson 06/15/2023 |
If you need to clean install Windows, you'll need a thumb drive, an ISO file, and a way to burn the thumb drive to a bootable ISO. While this sounds complicated on the surface, it's easy to do. Here's all you need to know.
The first thing you need to do, if you haven't, is deciding how to download Windows.
Video tutorial:
Media Creation Tool is the official app to download Windows from Microsoft. This is one way to download and create your media with one app that is the official app from Microsoft. If this is your preferred method, here is a step-by-step tutorial and video.
Moving on, there are many ways to download an ISO directly from Microsoft, or maybe you already have the ISO on your drive. Some of our favorite ways to download the latest ISO include:
Fido is a PowerShell script from the author of Rufus (which we will use below).
Microsoft Windows and Office ISO Download Tool can download Windows and Office ISO's including some ISO's that are hard to find.
Download from Microsoft using Google Chrome.
Download from Microsoft using Mozilla Firefox.
Download from Microsoft using Microsoft Edge.
Now that you have your ISO, you need to burn it to a thumb drive. Windows 10 and 11 won't fit on a standard CD or DVD, and many modern computers don't even come with a DVD drive! You will need a thumb or flash drive that is 8GB or larger. 8GB drives are cheap and can be purchased at your many stores, including Walgreens, Rite-Aid, Walmart, Target, and most retail stores.
Once again, there are quite a few ways to create your Windows installation media if you downloaded the ISO yourself. Ask any geek what app to use, and the answer will always be the same - Rufus. Rufus is free and portable. Download Rufus from MajorGeeks here.
Insert your flash drive and double-click on the Rufus executable to get started. Your thumb drive should be automatically selected.
Click on Select and click on your ISO file.
Many of the settings you need to use are automatically detected. That said, confirm the following settings:
Device: The flash drive you are using.
Image option: Standard Windows installation.
Partition scheme: GPT.
Target system: UEFI (non CSM).
Volume label: Leave or change to the new name for your flash drive.
File system: NTFS. This is one setting that is often set to FAT32 by default.
Cluster size: Leave at the default setting.
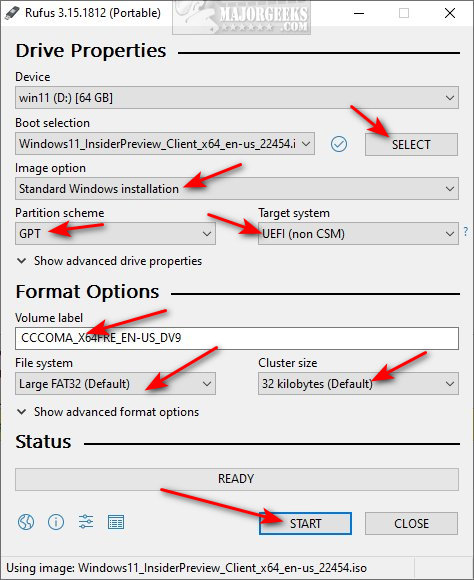
There are advanced options available under Drive Properties and Format Options if your computer is not detected properly.
Click on Start when ready. Average time is about 10 minutes.
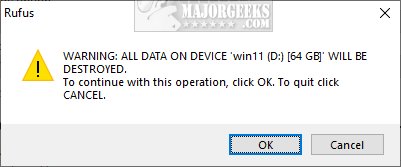
Click OK when the warning appears that all of your data on the selected flash drive will be deleted.
You can now wait while Rufus creates your bootable media. You should see a status bar at the bottom.
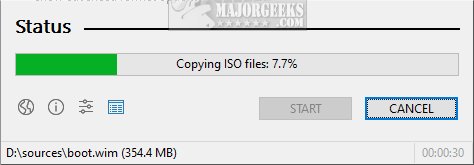
Rufus will notify you when your drive is ready.

If you find Rufus too complicated, you might try Ventoy. Ventoy is slightly easier to use but lacks some of the features of Rufus.
Similar:
How to Downgrade Windows 11 to Windows 10
Create a Windows 10 Bootable USB Flash Drive With Windows 10 Media Creation Tool
How to Download the Latest Windows 10 ISO Images Directly in Google Chrome
How to Download the Latest Windows 10 ISO Images Directly in Mozilla Firefox.
How to Download the Latest Windows 10 ISO Images Directly in Microsoft Edge
How to Find, Change, or Remove Number of Days to Go Back to the Previous Version of Windows
How to Find Your Windows 10 Original Install Date and Time
comments powered by Disqus
The first thing you need to do, if you haven't, is deciding how to download Windows.
Media Creation Tool is the official app to download Windows from Microsoft. This is one way to download and create your media with one app that is the official app from Microsoft. If this is your preferred method, here is a step-by-step tutorial and video.
Moving on, there are many ways to download an ISO directly from Microsoft, or maybe you already have the ISO on your drive. Some of our favorite ways to download the latest ISO include:
Now that you have your ISO, you need to burn it to a thumb drive. Windows 10 and 11 won't fit on a standard CD or DVD, and many modern computers don't even come with a DVD drive! You will need a thumb or flash drive that is 8GB or larger. 8GB drives are cheap and can be purchased at your many stores, including Walgreens, Rite-Aid, Walmart, Target, and most retail stores.
Once again, there are quite a few ways to create your Windows installation media if you downloaded the ISO yourself. Ask any geek what app to use, and the answer will always be the same - Rufus. Rufus is free and portable. Download Rufus from MajorGeeks here.
Insert your flash drive and double-click on the Rufus executable to get started. Your thumb drive should be automatically selected.
Click on Select and click on your ISO file.
Many of the settings you need to use are automatically detected. That said, confirm the following settings:
Device: The flash drive you are using.
Image option: Standard Windows installation.
Partition scheme: GPT.
Target system: UEFI (non CSM).
Volume label: Leave or change to the new name for your flash drive.
File system: NTFS. This is one setting that is often set to FAT32 by default.
Cluster size: Leave at the default setting.
There are advanced options available under Drive Properties and Format Options if your computer is not detected properly.
Click on Start when ready. Average time is about 10 minutes.
Click OK when the warning appears that all of your data on the selected flash drive will be deleted.
You can now wait while Rufus creates your bootable media. You should see a status bar at the bottom.
Rufus will notify you when your drive is ready.
If you find Rufus too complicated, you might try Ventoy. Ventoy is slightly easier to use but lacks some of the features of Rufus.
Similar:
comments powered by Disqus
