


How to Change Desktop Icon Spacing in Windows 10 & 11
By Timothy Tibbettson 06/15/2023 |
The Windows 10 Desktop has a default setting to keep each icon's horizontal and vertical space a certain distance apart. This tutorial explains how you can have more or less space between your Desktop icons.
If you'd rather not mess with the registry, we recommend you use the freeware Desktop Icon Spacing. For more control, you might consider DesktopOK.
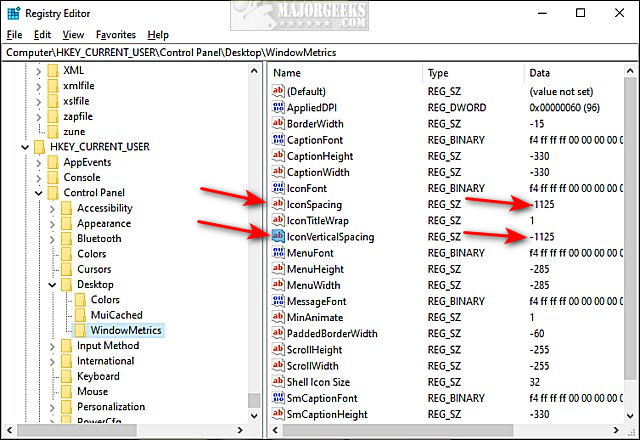
Open the Registry Editor and go to HKEY_CURRENT_USER\Control Panel\Desktop\WindowMetrics
We can customize the spacing for Horizontal or Vertical spacing.
For horizontal spacing, double-click IconSpacing
For vertical spacing, double-click IconVerticalSpacing
The number to modify can be found in the Value data field.
The default starting number should be about -1125. You can change that number from -480 (closest) to -2730 (farthest).
Similar:
How to Change Desktop Icon Size in Windows 10
How to Show App Names in Taskbar Icons
How to Center Your Taskbar Icons in Windows 10
How to Disable or Enable Thumbnail Previews in File Explorer
Desktop Icons Jump Back to Original Location When Moved
comments powered by Disqus
If you'd rather not mess with the registry, we recommend you use the freeware Desktop Icon Spacing. For more control, you might consider DesktopOK.
Open the Registry Editor and go to HKEY_CURRENT_USER\Control Panel\Desktop\WindowMetrics
We can customize the spacing for Horizontal or Vertical spacing.
For horizontal spacing, double-click IconSpacing
For vertical spacing, double-click IconVerticalSpacing
The number to modify can be found in the Value data field.
The default starting number should be about -1125. You can change that number from -480 (closest) to -2730 (farthest).
Similar:
comments powered by Disqus
