


How to Format Any Hard Drive in Windows 10 & 11
By Timothy Tibbettson 04/23/2023 |
Formatting a hard drive is a simple way to delete anything on any drive, including SATA, SSD, NVMe, or any external drive, including flash and thumb drives.
Before we discuss formatting your drive, if you're selling or donating an old computer and want to protect your data, security-conscious individuals should know that formatting the drive does not always guarantee someone can't recover your data. Instead, you might want to use Reset This PC, then use a free app like CCleaner to overwrite free space. Here's how that works.
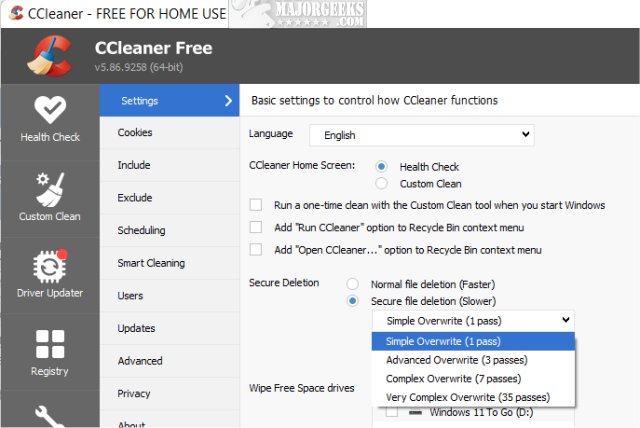
Click on Settings in CCleaner.
Check the box next to Secure file deletion.
Click on 1, 3, 7, or 35 passes. We recommend seven passes as each step takes much, much longer to complete, and seven should do the trick.
Let's look at how to format your drive next.
Video tutorial:
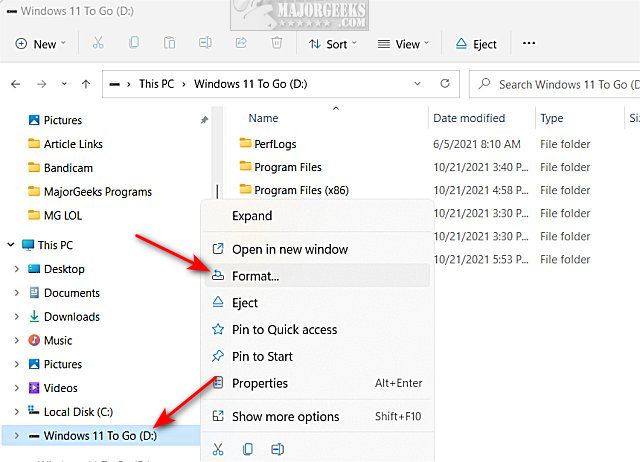
Begin by opening File Explorer.
Right-click on the drive you want to format.
Click on Format....
You now need to select how to format your drive, and for first-timers, it can be unclear, but it's simple. In most cases, you don't need to select or change anything except for Quick or Full Format. Let's briefly look at what the other settings do.
Capacity: The size of the drive after formatting.
File system: Typically NTFS for Windows and exFAT if you want the drive to be used on a Mac.
Allocation unit size: The block size used by the file system. The default size will work fine.
Restore device defaults: Will restore the known defaults from your drive. Some operating systems may have changed these settings.
Volume label: This is the name of the drive you see in File Explorer.
Format Options:
Quick Format: Delete everything and rebuild the file system, volume label, and cluster size.
Full Format: Does everything above, plus scan the partition for bad sectors and write zeros to the drive making files harder to recover.
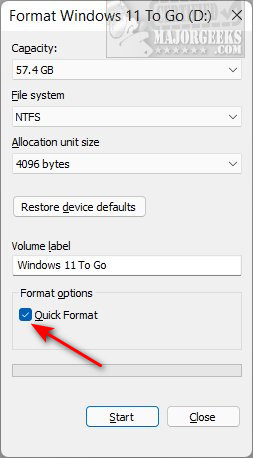
Uncheck Quick Format if you want to do a Full Format.
Click Start.
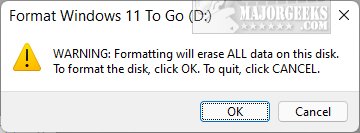
You will see a warning that ALL data will be erased from the drive.
Click OK.
The Start button will be greyed out, and you may see a progress bar at the bottom, usually when formatting is going to take some time, including Full formats and large hard drives.
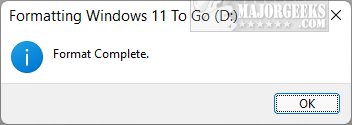
Click on OK when you see Format Complete.
If you need to burn Windows or Linux to a flash drive, we recommend Rufus or Ventoy.
Similar:
Quick Format and Full Format Explained
How to Erase a Disk Using Diskpart Clean Command in Windows
How to Format and Partition a Drive With PowerShell
comments powered by Disqus
Before we discuss formatting your drive, if you're selling or donating an old computer and want to protect your data, security-conscious individuals should know that formatting the drive does not always guarantee someone can't recover your data. Instead, you might want to use Reset This PC, then use a free app like CCleaner to overwrite free space. Here's how that works.
Click on Settings in CCleaner.
Check the box next to Secure file deletion.
Click on 1, 3, 7, or 35 passes. We recommend seven passes as each step takes much, much longer to complete, and seven should do the trick.
Let's look at how to format your drive next.
Begin by opening File Explorer.
Right-click on the drive you want to format.
Click on Format....
You now need to select how to format your drive, and for first-timers, it can be unclear, but it's simple. In most cases, you don't need to select or change anything except for Quick or Full Format. Let's briefly look at what the other settings do.
Capacity: The size of the drive after formatting.
File system: Typically NTFS for Windows and exFAT if you want the drive to be used on a Mac.
Allocation unit size: The block size used by the file system. The default size will work fine.
Restore device defaults: Will restore the known defaults from your drive. Some operating systems may have changed these settings.
Volume label: This is the name of the drive you see in File Explorer.
Format Options:
Quick Format: Delete everything and rebuild the file system, volume label, and cluster size.
Full Format: Does everything above, plus scan the partition for bad sectors and write zeros to the drive making files harder to recover.
Uncheck Quick Format if you want to do a Full Format.
Click Start.
You will see a warning that ALL data will be erased from the drive.
Click OK.
The Start button will be greyed out, and you may see a progress bar at the bottom, usually when formatting is going to take some time, including Full formats and large hard drives.
Click on OK when you see Format Complete.
If you need to burn Windows or Linux to a flash drive, we recommend Rufus or Ventoy.
Similar:
comments powered by Disqus
