


How to Turn On or Off Require Sign-in on Wakeup in Windows 10
By Timothy Tibbettson 07/18/2023 |
For security, Windows 10 will ask for your password when resuming from Sleep or Hibernate. You can find the settings to disable required sign-in by trying these ideas.
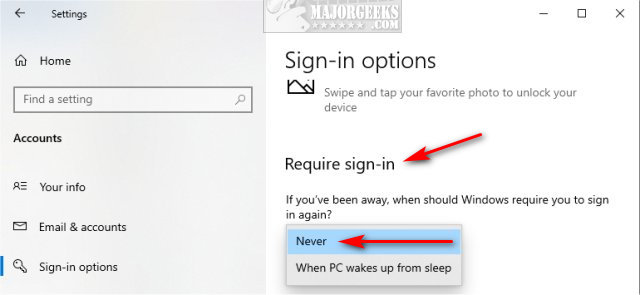
1: Sign-in Options
Your best bet is to check your Sign-in Options. Click Start > Settings > Accounts > Sign-in Options.
Scroll down on the right side and find Sign-in options > Require sign-in. Click on the dropdown box and change to Never.
2: Use Command Prompt
Using the Command-Prompt or PowerShell, we can enable or disable Sign-in on Wakeup for a computer that's either plugged in or battery.
Plugged in:
On - powercfg /SETACVALUEINDEX SCHEME_CURRENT SUB_NONE CONSOLELOCK 1
Off - powercfg /SETACVALUEINDEX SCHEME_CURRENT SUB_NONE CONSOLELOCK 0
Battery:
On - powercfg /SETDCVALUEINDEX SCHEME_CURRENT SUB_NONE CONSOLELOCK 1
Off - powercfg /SETDCVALUEINDEX SCHEME_CURRENT SUB_NONE CONSOLELOCK 0
3: Use Group Policy Editor
Group Policy Editor is only for Windows 10 Pro, Enterprise, and Education. Windows 10 Home users can enable GPE by following this guide.
Open Group Policy Editor and go to Computer Configuration > Administrative Templates > System > Power Management > Sleep Settings.
Click on either plugged in or on battery.
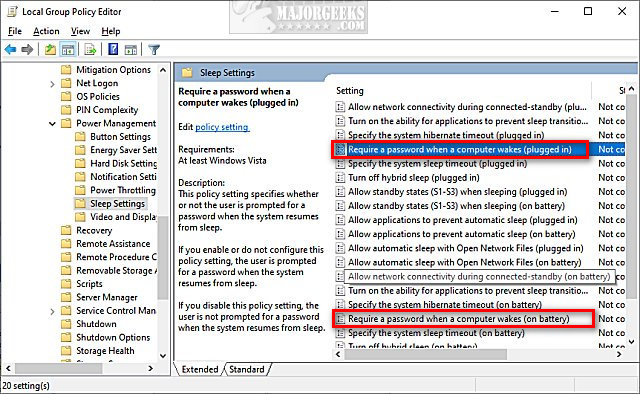
The default setting is Not Configured, meaning you are prompted for sign-in.
Disabled means you won't be prompted for a sign-in.
Enabled means you will be prompted for sign-in, and that's the same as Not Configured.
4: In Closing
There used to be two other ways to make the changes, but these methods have disappeared. You might find these tips mentioned in other guides and the first no longer exists and the second may screw up your registry, and hence, your computer.
The first method allowed you to make changes in the Power plan, but that option is gone.
The second was a registry edit that required you to edit the DCSettingIndex and ACSettingIndex DWORDs, but they now are only listed as redirects.
Similar:
Sleep, Hibernate or Shut Down Your PC?
How to Add or Remove Sleep, Hibernate or Lock to the Start Menu in Windows 10.
Windows 10 Goes to Sleep Early
How to Turn on the Windows 10 Ultimate Performance Power Plan
The Ultimate List of Every Known Powercfg Command
comments powered by Disqus
1: Sign-in Options
Your best bet is to check your Sign-in Options. Click Start > Settings > Accounts > Sign-in Options.
Scroll down on the right side and find Sign-in options > Require sign-in. Click on the dropdown box and change to Never.
2: Use Command Prompt
Using the Command-Prompt or PowerShell, we can enable or disable Sign-in on Wakeup for a computer that's either plugged in or battery.
Plugged in:
On - powercfg /SETACVALUEINDEX SCHEME_CURRENT SUB_NONE CONSOLELOCK 1
Off - powercfg /SETACVALUEINDEX SCHEME_CURRENT SUB_NONE CONSOLELOCK 0
Battery:
On - powercfg /SETDCVALUEINDEX SCHEME_CURRENT SUB_NONE CONSOLELOCK 1
Off - powercfg /SETDCVALUEINDEX SCHEME_CURRENT SUB_NONE CONSOLELOCK 0
3: Use Group Policy Editor
Group Policy Editor is only for Windows 10 Pro, Enterprise, and Education. Windows 10 Home users can enable GPE by following this guide.
Open Group Policy Editor and go to Computer Configuration > Administrative Templates > System > Power Management > Sleep Settings.
Click on either plugged in or on battery.
The default setting is Not Configured, meaning you are prompted for sign-in.
Disabled means you won't be prompted for a sign-in.
Enabled means you will be prompted for sign-in, and that's the same as Not Configured.
4: In Closing
There used to be two other ways to make the changes, but these methods have disappeared. You might find these tips mentioned in other guides and the first no longer exists and the second may screw up your registry, and hence, your computer.
The first method allowed you to make changes in the Power plan, but that option is gone.
The second was a registry edit that required you to edit the DCSettingIndex and ACSettingIndex DWORDs, but they now are only listed as redirects.
Similar:
comments powered by Disqus
