


How to Use the Windows Memory Diagnostic Tool in Windows
By Timothy Tibbettson 06/15/2023 |
Windows 10, 8, and 7 includes the Windows Memory Diagnostic tool that can scan your memory in Basic, Standard, or Advanced modes. This guide shows you all you need to know about this tool and why you probably don't need it.
Many years ago, memory testing apps and memory cleaners were all the rage because RAM was expensive. That's no longer the case. Also, these tests often take hours to complete, and you'd be hard-pressed to find a tech who would waste his time scanning your memory for errors on today's modern computers because (for example) 4GB sticks of RAM sell for under $20. Your tech is going to charge you that or more for the first hour.
Every computer today should have at least two sticks of RAM. If you receive a memory error or suspect memory is the cause of Windows errors, you'll want to shut down, open your computer and remove all but one stick of RAM and start your computer up. Using the elimination process, we can continue to start your computer until you find the bad memory or eliminate memory as the problem.
Of course, there may be times that you need, or want, to scan your memory. A lot of computer stores will do this before selling used RAM to verify that it's okay. It's also useful if your computer is under warranty.
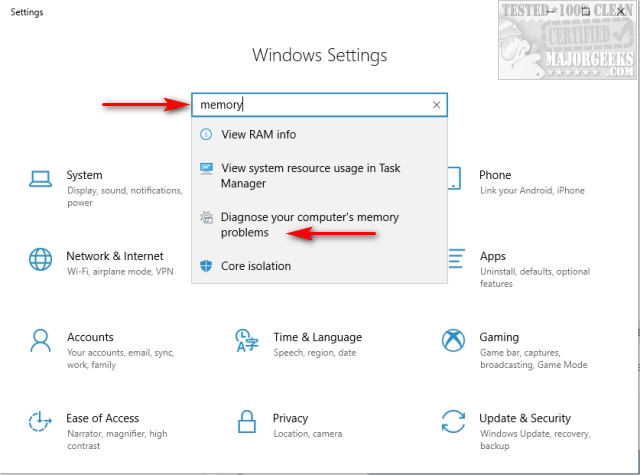
Press the Windows Key + S and type memory in the search bar at the top and click on Windows Memory Diagnostic. You can also press the Windows Key + R and type in mdsched.
You now have the option to restart and check now or check on the next reboot.

Once you reboot, the Windows Memory Diagnostic Tool will begin testing in Standard mode, the best mode for most situations.
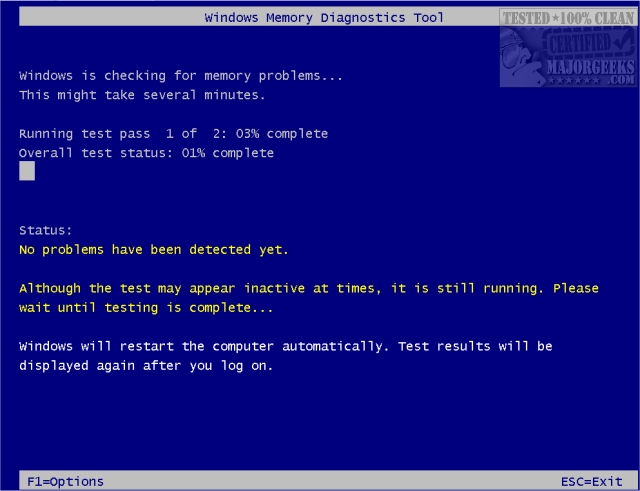
You can press F1 and choose Basic or Extended scans. Press the tab key to change the cache or pass count settings; if you decide to change these settings, press f10 to Apply and continue.
If you change your mind, press the Escape (ESC) key at any time to stop and return to Windows.
If your computer has rebooted while you were away, you'll need to check the Event Viewer. Press the Windows Key + S and type in event viewer and click on Event Viewer when it appears. Click on Windows Logs, System. Expand the Source tab and look for the memory results there.
If you can't get to Windows at all, boot from your Windows DVD if you have one, or if you have access to another computer, download Windows 10 Media Creation Tool and create a Windows 10 DVD. Everyone should have a copy of Windows on DVD for cases just like this.
If you can't do that, you'll need to either pull the plug or hold down the power button to force your computer off and turn it back on. You may need to do this four or five times before it works and brings up Troubleshooting.
Click Troubleshoot > Advanced Options < Command Prompt where you can now typr in mdsched.
Similar:
How to Disable or Enable SysMain (Superfetch)
How to Check Your Memory (RAM) Speed, Available Slots and More
How to Manage Virtual Memory (Pagefile) in Windows 10
The Differences Between 32-bit and 64-bit Applications
comments powered by Disqus
Many years ago, memory testing apps and memory cleaners were all the rage because RAM was expensive. That's no longer the case. Also, these tests often take hours to complete, and you'd be hard-pressed to find a tech who would waste his time scanning your memory for errors on today's modern computers because (for example) 4GB sticks of RAM sell for under $20. Your tech is going to charge you that or more for the first hour.
Every computer today should have at least two sticks of RAM. If you receive a memory error or suspect memory is the cause of Windows errors, you'll want to shut down, open your computer and remove all but one stick of RAM and start your computer up. Using the elimination process, we can continue to start your computer until you find the bad memory or eliminate memory as the problem.
Of course, there may be times that you need, or want, to scan your memory. A lot of computer stores will do this before selling used RAM to verify that it's okay. It's also useful if your computer is under warranty.
Press the Windows Key + S and type memory in the search bar at the top and click on Windows Memory Diagnostic. You can also press the Windows Key + R and type in mdsched.
You now have the option to restart and check now or check on the next reboot.
Once you reboot, the Windows Memory Diagnostic Tool will begin testing in Standard mode, the best mode for most situations.
You can press F1 and choose Basic or Extended scans. Press the tab key to change the cache or pass count settings; if you decide to change these settings, press f10 to Apply and continue.
If you change your mind, press the Escape (ESC) key at any time to stop and return to Windows.
If your computer has rebooted while you were away, you'll need to check the Event Viewer. Press the Windows Key + S and type in event viewer and click on Event Viewer when it appears. Click on Windows Logs, System. Expand the Source tab and look for the memory results there.
If you can't get to Windows at all, boot from your Windows DVD if you have one, or if you have access to another computer, download Windows 10 Media Creation Tool and create a Windows 10 DVD. Everyone should have a copy of Windows on DVD for cases just like this.
If you can't do that, you'll need to either pull the plug or hold down the power button to force your computer off and turn it back on. You may need to do this four or five times before it works and brings up Troubleshooting.
Click Troubleshoot > Advanced Options < Command Prompt where you can now typr in mdsched.
Similar:
comments powered by Disqus
