


How to View Your Reliability History in Windows 10 & 11
By Timothy Tibbettson 09/23/2022 |
The Reliability Monitor in Windows lets you view details about your computer's reliability and problem history. You can see hardware and software problems affecting your computer and address those issues for a better running PC.
Video tutorial:
Open the Control Panel in icon view.
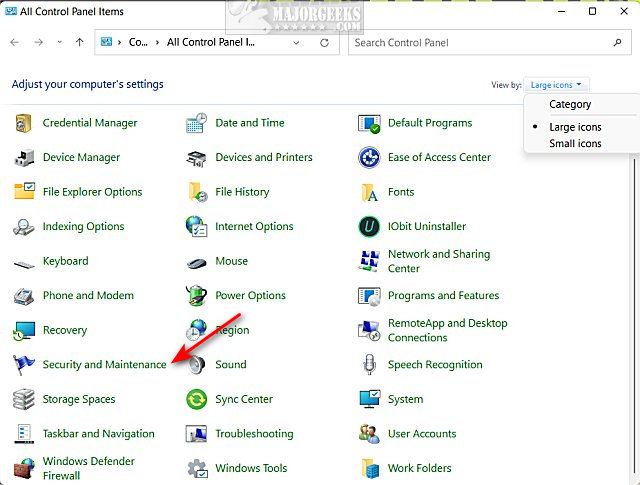
Click on Security and Maintenance.
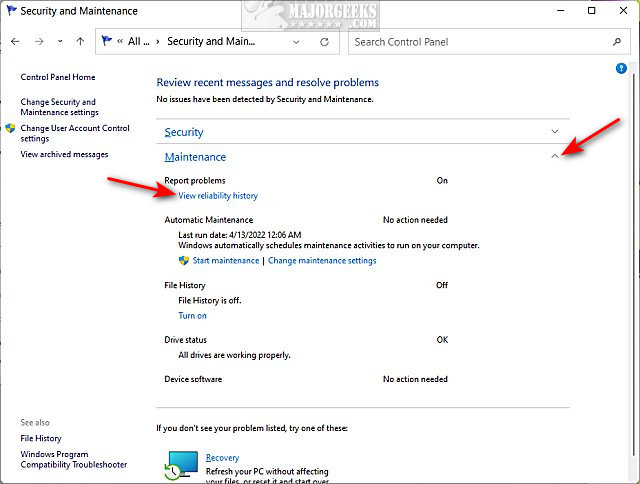
Expand Maintenance and click on View reliability history.
Every computer will be different, but the Reliability Monitor is easy to use and understand at any skill level.
Here's a primer to get you started.
Near the top, choose to show the results everything by Days or Weeks.
There are five rows to view, and the categories include:
Application failures - Failures from an installed application
Windows failures - Windows operating system errors
Miscellaneous failures - Errors that don't fit into the above categories
Warnings - Usually failed Windows Updates
Information - Usually the latest installed Windows Updates.
Most errors or problems will appear next to a red X or a yellow triangle. Click on either of those to see the problem.
The blue exclamation point references recent Windows Updates.
When you click on an item, you can see the list of errors and click on one to see the problem.
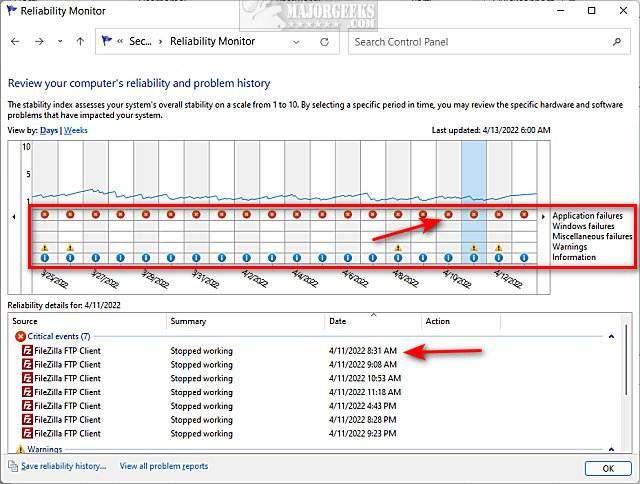
Double-click on a result for more details.

Near the bottom, you can save the reliability history, or another of our favorites is to click on View all problem reports.
If you think you've solved the problem, you can clear all problem reports from here, then check back in a couple of days to see if you resolved the problem.

As you can see, Reliability History can show you many issues some you might not be aware of that can affect the performance and reliability of your computer.
Similar:
How to View and Clear Your Reliability History in Windows 10 & 11
How to Enable and Use Diagnostic Data Viewer in Windows 10 & 11
Video: Windows 10 & 11 Problems You Can Fix Yourself With Included Troubleshooters
How to Reset or Reinstall Windows 10 & 11 Using the Cloud
Enable, Disable, Manage, Delete or Create a System Restore Point
comments powered by Disqus
Open the Control Panel in icon view.
Click on Security and Maintenance.
Expand Maintenance and click on View reliability history.
Every computer will be different, but the Reliability Monitor is easy to use and understand at any skill level.
Here's a primer to get you started.
Near the top, choose to show the results everything by Days or Weeks.
There are five rows to view, and the categories include:
Most errors or problems will appear next to a red X or a yellow triangle. Click on either of those to see the problem.
The blue exclamation point references recent Windows Updates.
When you click on an item, you can see the list of errors and click on one to see the problem.
Double-click on a result for more details.
Near the bottom, you can save the reliability history, or another of our favorites is to click on View all problem reports.
If you think you've solved the problem, you can clear all problem reports from here, then check back in a couple of days to see if you resolved the problem.
As you can see, Reliability History can show you many issues some you might not be aware of that can affect the performance and reliability of your computer.
Similar:
comments powered by Disqus
