


Remove the "Give Access to" Context Menu in Windows 10
By Timothy Tibbettson 06/19/2023 |
With the latest Windows 10, we're sure you've noticed some changes. We recently showed you how to remove the Remove the Share Context Menu in Windows 10 and today we're going to show you how to remove the "Give Access to" context menu in Windows 10.
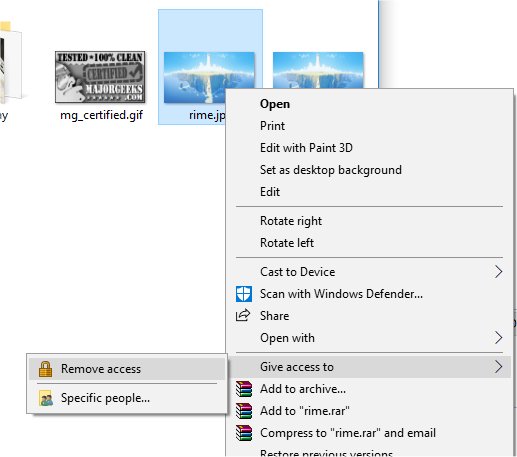
If you right-click on a file or folder, the Share looks like this:
We do suggest that you back up the registry before you proceed. Here's how How to Back up or Restore the Windows Registry.
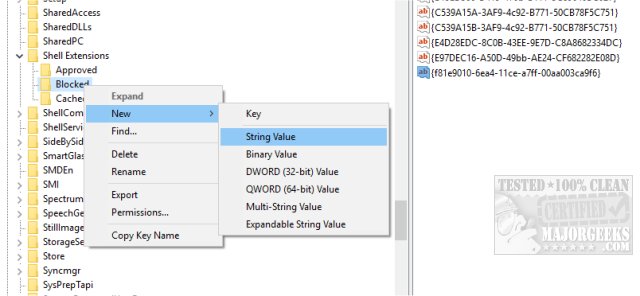
Removing it is not as simple as most things, for now. You'll need to create a registry key. Press WIN+R (WIN being the Windows key) and enter regedit and browse to the Shell Extensions folder:
We need to create or locate the Blocked key in the Shell Extensions folder. If you don't have a blocked folder, right-click in the Shell Extensions folder and select "New Key" and call it Blocked.
If you already have a Blocked registry folder, follow the next step.
Right-click on the Blocked folder and select "New > String Value."
Enter
in the blank space and press enter.
Restart or log out and the "Give Access to" Context Menu is gone. Should you want it back, just follow the same steps above and delete the f81e9010-6ea4-11ce-a7ff-00aa003ca9f6 string you created.
Please note this will not affect your ability to give access, only remove the right-click context menu item.
Similar:
How to Delete, Add, and Edit Context Menu Items
How to Fix a Screwed Up Right-Click Context Menu
Add the Control Panel to the Context Menu in Windows 10
Add 'Kill All Not Responding Tasks' Context Men
Open Powershell Window Here as Administrator Context Menu
How to Add File Hash to the Context Menu
How to Restore Missing Pin to Start Context Menu in Windows 10
How to Add Timeline or TaskView to the Windows 10 Context Menu
Remove the "Share" Context Menu in Windows 10
comments powered by Disqus
If you right-click on a file or folder, the Share looks like this:
We do suggest that you back up the registry before you proceed. Here's how How to Back up or Restore the Windows Registry.
Removing it is not as simple as most things, for now. You'll need to create a registry key. Press WIN+R (WIN being the Windows key) and enter regedit and browse to the Shell Extensions folder:
HKEY_LOCAL_MACHINE\SOFTWARE\MicrosoftWindowsCurrentVersionShellExtensions
We need to create or locate the Blocked key in the Shell Extensions folder. If you don't have a blocked folder, right-click in the Shell Extensions folder and select "New Key" and call it Blocked.
If you already have a Blocked registry folder, follow the next step.
Right-click on the Blocked folder and select "New > String Value."
Enter
{f81e9010-6ea4-11ce-a7ff-00aa003ca9f6}
in the blank space and press enter.
Restart or log out and the "Give Access to" Context Menu is gone. Should you want it back, just follow the same steps above and delete the f81e9010-6ea4-11ce-a7ff-00aa003ca9f6 string you created.
Please note this will not affect your ability to give access, only remove the right-click context menu item.
Similar:
How to Delete, Add, and Edit Context Menu Items
How to Fix a Screwed Up Right-Click Context Menu
Add the Control Panel to the Context Menu in Windows 10
Add 'Kill All Not Responding Tasks' Context Men
Open Powershell Window Here as Administrator Context Menu
How to Add File Hash to the Context Menu
How to Restore Missing Pin to Start Context Menu in Windows 10
How to Add Timeline or TaskView to the Windows 10 Context Menu
Remove the "Share" Context Menu in Windows 10
comments powered by Disqus
