


Windows Store Cache May Be Damaged
By Timothy Tibbetts |
If you've received an error message that the Windows Store cache may be damaged, there are a few possible solutions to getting the Windows Store back up and running.
Before you begin, you should create a System Restore point.
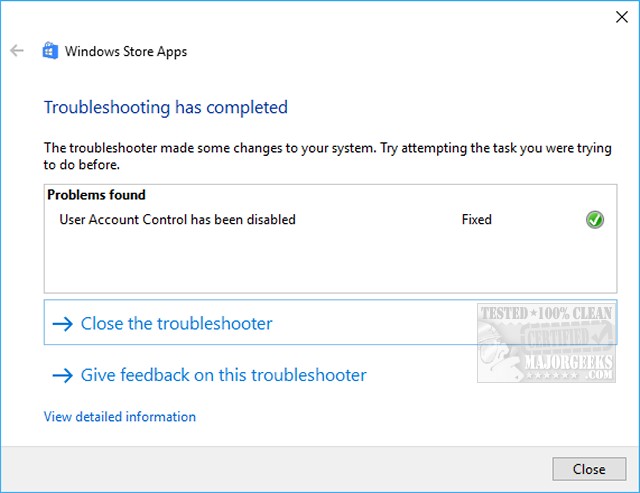
1: Run the Windows Store Apps Troubleshooter
While it might seem like an obvious solution, the Windows Store Apps Troubleshooter can often find and fix your problem. Go to Start > Settings > Updates & Security > Troubleshoot. Scroll down to the Windows Store Apps troubleshooter and click on Run the Troubleshooter. The troubleshooter runs automatically unless you have User Account Control enabled, but it can disable that for you.
2: Run WSReset.exe
Press the Windows key + X and choose Windows PowerShell (Admin). Right click on that and Run as administrator. Type in wsreset.exe. and press enter.
* Some guides recommend running WSReset.exe from the System32 folder and or deleting the Microsoft.WindowsStore folder, but these no longer work or exist in those locations. As far as we know, the troubleshooter does this for you now and is the reason that running the troubleshooter is the first step.
3: Try a Drive Cleaner
Some drive cleaners may get rid of some junk files and clean your drive is a good idea anyway. Wise Disk Cleaner, CCleaner, or Privazer would be our top choices.
4: Run Microsoft System File Checker
Microsoft System File Checker is a useful, built-in utility that can scan for and restore corrupted files in Windows.
Windows 10, Windows 8.1, or Windows 8 users will need to first run the Deployment Image Servicing and Management (DISM) tool before running the System File Checker. DISM will use Windows Update to provide any files that are needed to fix corruptions. If you skip this step, System File Checker might not work. Windows 7 and Vista users can skip this step.
You will need to first open the Command Prompt or PowerShell as administrator.
Type in DISM.exe /Online /Cleanup-image /Restorehealth and press enter. This may take a few minutes.
2: Running System File Checker
All you need to do is type in sfc /scannow followed by Enter.
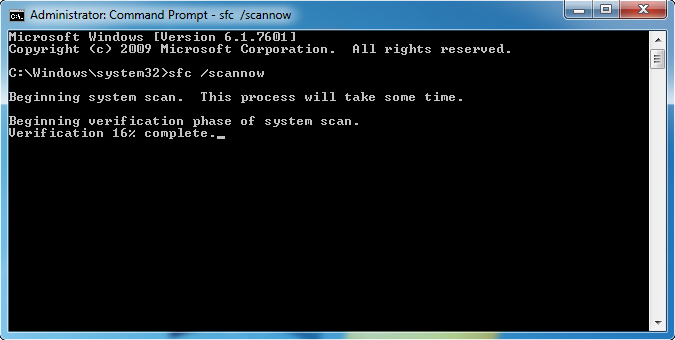
System File Checker will now scan for and replace files from the Windows cache, typically located at C:\Windows\System32\dllcache.
5: Try these Power Shell Commands
In our story, Solved: Windows Store Does Not Open - Missing PurgeCaches, we looked at a similar problem that might solve this problem as well. Because of the length, and that it's a last-ditch attempt, we're only providing a link and saving this fix for last.
Similar:
How to Restore Windows Store on Windows 10
How to Clear the Microsoft Windows Store Cache in Windows 10
How-To Disable the Windows Store on Windows 10 (Video)
Solved: Windows Store Does Not Open - Missing PurgeCaches
How to Fix 'The Microsoft Store Needs to be Online' Error
comments powered by Disqus
Before you begin, you should create a System Restore point.
1: Run the Windows Store Apps Troubleshooter
While it might seem like an obvious solution, the Windows Store Apps Troubleshooter can often find and fix your problem. Go to Start > Settings > Updates & Security > Troubleshoot. Scroll down to the Windows Store Apps troubleshooter and click on Run the Troubleshooter. The troubleshooter runs automatically unless you have User Account Control enabled, but it can disable that for you.
2: Run WSReset.exe
Press the Windows key + X and choose Windows PowerShell (Admin). Right click on that and Run as administrator. Type in wsreset.exe. and press enter.
* Some guides recommend running WSReset.exe from the System32 folder and or deleting the Microsoft.WindowsStore folder, but these no longer work or exist in those locations. As far as we know, the troubleshooter does this for you now and is the reason that running the troubleshooter is the first step.
3: Try a Drive Cleaner
Some drive cleaners may get rid of some junk files and clean your drive is a good idea anyway. Wise Disk Cleaner, CCleaner, or Privazer would be our top choices.
4: Run Microsoft System File Checker
Microsoft System File Checker is a useful, built-in utility that can scan for and restore corrupted files in Windows.
Windows 10, Windows 8.1, or Windows 8 users will need to first run the Deployment Image Servicing and Management (DISM) tool before running the System File Checker. DISM will use Windows Update to provide any files that are needed to fix corruptions. If you skip this step, System File Checker might not work. Windows 7 and Vista users can skip this step.
You will need to first open the Command Prompt or PowerShell as administrator.
Type in DISM.exe /Online /Cleanup-image /Restorehealth and press enter. This may take a few minutes.
2: Running System File Checker
All you need to do is type in sfc /scannow followed by Enter.
System File Checker will now scan for and replace files from the Windows cache, typically located at C:\Windows\System32\dllcache.
5: Try these Power Shell Commands
In our story, Solved: Windows Store Does Not Open - Missing PurgeCaches, we looked at a similar problem that might solve this problem as well. Because of the length, and that it's a last-ditch attempt, we're only providing a link and saving this fix for last.
Similar:
comments powered by Disqus
