


Windows 10 Doesn't Connect to Wi-Fi on Startup
By Timothy Tibbettson 06/15/2023 |
Once you've made a Wi-Fi connection with your Desktop or Laptop, you expect that the connection will be made every time Windows starts, and it should. If not, here are some troubleshooting steps you can take to resolve the problem.
1: Verify Wi-Fi is Connecting Automatically
Type wireless into search and click on Wi-Fi Settings. Click on your wireless adapter.
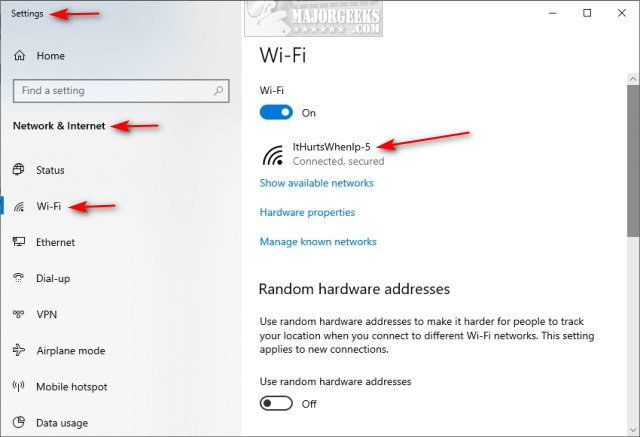
You could also go to Start > Settings > Network & Internet > Wi-Fi.
Verify that Connect automatically when in range is toggled on.
2: Run Internet Connections Troubleshooter
The troubleshooter might find a problem you weren't aware existed. Click on Start > Settings Update & Security > Troubleshoot and click on Internet Connections. Follow the prompts.
See Windows 10 Problems You Can Fix Yourself With Included Troubleshooters if you need further assistance with troubleshooters.
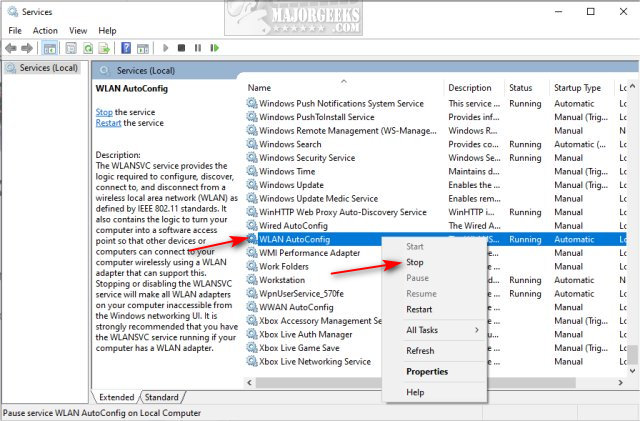
3: Delete WLANSVC Files
WLANSVC or WLAN Auto Config Service is the service that manages connecting and disconnecting from wireless networks. We're going to stop the WLAN AutoConfig service, so we can delete some temporary files, then restart the WLAN AutoConfig service.
Press the Windows Key + R and type in services.msc. Scroll down to WLAN AutoConfig. Right-click WLAN AutoConfig and select Stop. Kepp the Services window open.
Open File Explorer and enter C:\ProgramData\Microsoft\Wlansvc\Profiles\Interfaces in the navigation bar.
Delete any folders in the Interfaces folder.
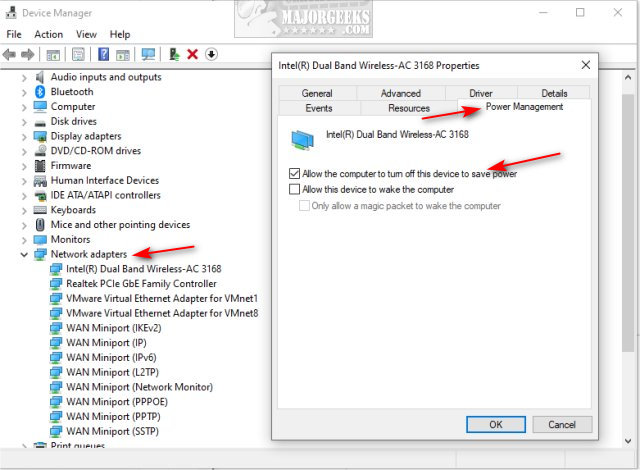
4: Check Power Management Settings
Press the Windows Key + X and click Device Manager. Expand Network adapters and double-click on your wireless networking card.
Click on the Power Management tab and uncheck allow the computer to turn off this device to save power.
Go back to Services and right-click WLAN AutoConfig and select Start.
Similar:
How to Improve Your Wireless Network Performance
How to See Your Network Adapter Speed in Windows 10
Hide or Block Neighbor's Wi-Fi Networks on Windows
How to Fix Slow Internet on Windows 10
How to Reset Network Settings in Windows 10
How-To Reset Winsock on Windows 1087
What is Windows Auto-Tuning?
comments powered by Disqus
1: Verify Wi-Fi is Connecting Automatically
Type wireless into search and click on Wi-Fi Settings. Click on your wireless adapter.
You could also go to Start > Settings > Network & Internet > Wi-Fi.
Verify that Connect automatically when in range is toggled on.
2: Run Internet Connections Troubleshooter
The troubleshooter might find a problem you weren't aware existed. Click on Start > Settings Update & Security > Troubleshoot and click on Internet Connections. Follow the prompts.
See Windows 10 Problems You Can Fix Yourself With Included Troubleshooters if you need further assistance with troubleshooters.
3: Delete WLANSVC Files
WLANSVC or WLAN Auto Config Service is the service that manages connecting and disconnecting from wireless networks. We're going to stop the WLAN AutoConfig service, so we can delete some temporary files, then restart the WLAN AutoConfig service.
Press the Windows Key + R and type in services.msc. Scroll down to WLAN AutoConfig. Right-click WLAN AutoConfig and select Stop. Kepp the Services window open.
Open File Explorer and enter C:\ProgramData\Microsoft\Wlansvc\Profiles\Interfaces in the navigation bar.
Delete any folders in the Interfaces folder.
4: Check Power Management Settings
Press the Windows Key + X and click Device Manager. Expand Network adapters and double-click on your wireless networking card.
Click on the Power Management tab and uncheck allow the computer to turn off this device to save power.
Go back to Services and right-click WLAN AutoConfig and select Start.
Similar:
comments powered by Disqus
