


How to Fix Slow Internet on Windows 10
By Timothy Tibbettson 07/18/2023 |
Diagnosing slow internet speeds can be difficult. Your issues can be with your operating system, router, wireless connection, or even your internet provider. If you are experiencing slow speeds with Windows 10, here are some steps you can take.
Be sure to take a look at similar stories at the bottom of this article for other possible suggestions.
1: Test Your Speeds
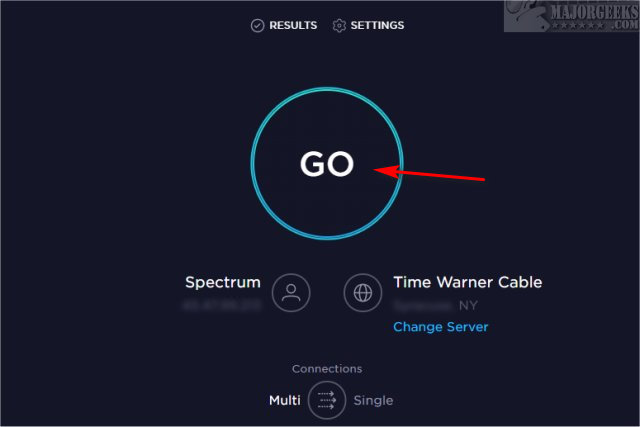
Sometimes, the problem may be temporary, or you feel like things are slow, so let's test your internet speed at SpeedTest.Net.
SpeedTest will automatically determine your ISP and location so you can get the most accurate results. Click on Go and wait for your results. You'll need to know what speeds you're paying for so that you know you're getting what you paid for.
2: Configure Bandwidth Allocation
Before proceeding Microsoft has stated "The Windows Operating System reserves a fixed percentage of the total Internet bandwidth for the QoS or Quality of Service usage like Windows update, license renewal, etc. Thus, when you limit the Reservable Bandwidth of the operating system to 0, this will affect the operating system activities like Automatic Windows Updates. If a QoS-aware application reserves more bandwidth than it uses, then the unused, reserved bandwidth is available for use by other applications. The reservation does not ensure that the bandwidth will be available to the QoS-aware application because applications that are not QoS-aware might consume too much bandwidth."
We can override this setting with Group Policy Editor. Windows 10 Home users don't have the GPE, but you can enable it by following these steps.
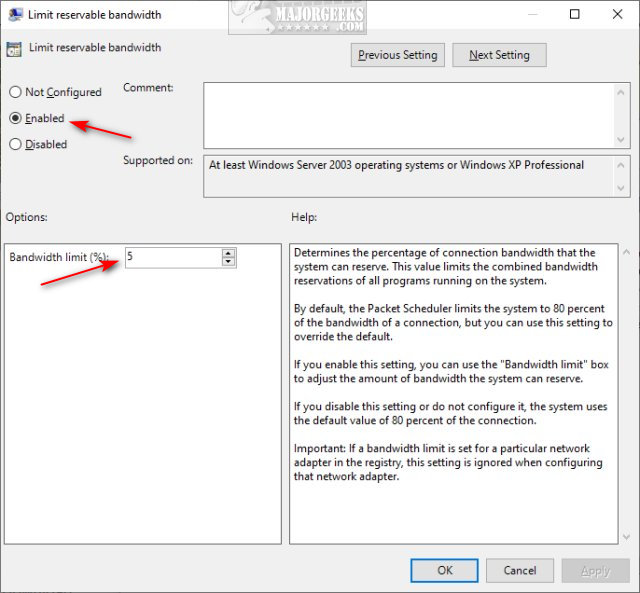
Open Group Policy Editor and navigate to Computer Configuration > Administrative Templates > Network > QoS Packet Scheduler.
Double-click on Limit reservable bandwidth. Click on Enabled, then change the Bandwidth limit to 0 or 5 to reserve a little bandwidth.
Reboot for the changes to apply.
3: Reset Windows Auto-Tuning Level
Windows Auto-Tuning is a feature introduced in Windows Vista and still in use on Windows 10. Windows Auto-Tuning was designed to automatically improve the performance for programs that receive TCP data over a network.
Windows Auto-Tuning should be enabled and left alone unless you have a router, WI-Fi, network card, or a firewall that does not support this feature. Keep in mind if your hardware does not support Auto-Tuning that could be your problem.
Let's take a look at how to check for or even enable and disable Windows Auto-Tuning.
To find your current Auto-Tuning status, open a Command-Prompt and type in netsh interface tcp show global.
Look for Receive Windows Auto-Tuning Level. You should see normal. If so, you can move on.
Here are the commands to enable or disable Auto-Tuning:
Enable: netsh int tcp set global autotuninglevel=normal
Disable: netsh int tcp set global autotuninglevel=disabled
4: Check for Bandwidth Hogging Applications
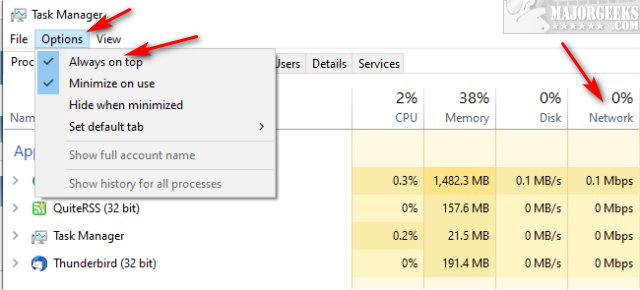
If you start Task Manager, you can watch the Network tab and see if something is hogging your bandwidth. Press CTRL + ALT + DEL and click on Task Manager. Click on the Options tab and click Always on top.
Now go about doing what you're doing and keep an eye on the Network column to see if it spikes, highlighting where your bandwidth is being used the most.
5: Check Your Router
While unlikely, your router may be pre-configured to limit bandwidth for specific situations or times. The problem with this method is that every router is different so you'll need to poke around. We discuss this, and include some links, in our article on How to Update Your Router Firmware.
6: Update Your Drivers
As always, tech support 101 requires your drivers are up to date. Updating only your network drivers isn't enough. You also need to update your motherboard drivers because they work together.
Take a look at How to Download the Latest Drivers for Windows and follow those steps if you know your drivers aren't up to date.
7: Use a Third-Party Tweaker
Windows, as you know, has a massive amount of freeware apps and tweakers, but only one stands above the rest with a 20-year plus history - SpeedGuide.net TCP Optimizer.
The program can aid both the novice and the advanced user in tweaking related TCP/IP parameters in the Windows Registry, making it easy to tune your system to the type of Internet connection used. The tool uses advanced algorithms, and the bandwidth*delay product to find the best TCP Window for your specific connection speed.
While the app can get geeky, most people can load presets that are available.
Similar:
How to Improve Your Wireless Network Performance
How to See Your Network Adapter Speed in Windows 10
How to Download the Latest Drivers for Windows
How to Reset Network Settings in Windows 10
What is Windows Auto-Tuning?
How to Update Your Router Firmware
How to View and Reset Network Data Usage in Windows 10
How-To Reset TCP/IP or Internet Protocol
How-To Flush the Windows DNS Cache
How-To Reset Winsock on Windows 1087
comments powered by Disqus
Be sure to take a look at similar stories at the bottom of this article for other possible suggestions.
1: Test Your Speeds
Sometimes, the problem may be temporary, or you feel like things are slow, so let's test your internet speed at SpeedTest.Net.
SpeedTest will automatically determine your ISP and location so you can get the most accurate results. Click on Go and wait for your results. You'll need to know what speeds you're paying for so that you know you're getting what you paid for.
2: Configure Bandwidth Allocation
Before proceeding Microsoft has stated "The Windows Operating System reserves a fixed percentage of the total Internet bandwidth for the QoS or Quality of Service usage like Windows update, license renewal, etc. Thus, when you limit the Reservable Bandwidth of the operating system to 0, this will affect the operating system activities like Automatic Windows Updates. If a QoS-aware application reserves more bandwidth than it uses, then the unused, reserved bandwidth is available for use by other applications. The reservation does not ensure that the bandwidth will be available to the QoS-aware application because applications that are not QoS-aware might consume too much bandwidth."
We can override this setting with Group Policy Editor. Windows 10 Home users don't have the GPE, but you can enable it by following these steps.
Open Group Policy Editor and navigate to Computer Configuration > Administrative Templates > Network > QoS Packet Scheduler.
Double-click on Limit reservable bandwidth. Click on Enabled, then change the Bandwidth limit to 0 or 5 to reserve a little bandwidth.
Reboot for the changes to apply.
3: Reset Windows Auto-Tuning Level
Windows Auto-Tuning is a feature introduced in Windows Vista and still in use on Windows 10. Windows Auto-Tuning was designed to automatically improve the performance for programs that receive TCP data over a network.
Windows Auto-Tuning should be enabled and left alone unless you have a router, WI-Fi, network card, or a firewall that does not support this feature. Keep in mind if your hardware does not support Auto-Tuning that could be your problem.
Let's take a look at how to check for or even enable and disable Windows Auto-Tuning.
To find your current Auto-Tuning status, open a Command-Prompt and type in netsh interface tcp show global.
Look for Receive Windows Auto-Tuning Level. You should see normal. If so, you can move on.
Here are the commands to enable or disable Auto-Tuning:
Enable: netsh int tcp set global autotuninglevel=normal
Disable: netsh int tcp set global autotuninglevel=disabled
4: Check for Bandwidth Hogging Applications
If you start Task Manager, you can watch the Network tab and see if something is hogging your bandwidth. Press CTRL + ALT + DEL and click on Task Manager. Click on the Options tab and click Always on top.
Now go about doing what you're doing and keep an eye on the Network column to see if it spikes, highlighting where your bandwidth is being used the most.
5: Check Your Router
While unlikely, your router may be pre-configured to limit bandwidth for specific situations or times. The problem with this method is that every router is different so you'll need to poke around. We discuss this, and include some links, in our article on How to Update Your Router Firmware.
6: Update Your Drivers
As always, tech support 101 requires your drivers are up to date. Updating only your network drivers isn't enough. You also need to update your motherboard drivers because they work together.
Take a look at How to Download the Latest Drivers for Windows and follow those steps if you know your drivers aren't up to date.
7: Use a Third-Party Tweaker
Windows, as you know, has a massive amount of freeware apps and tweakers, but only one stands above the rest with a 20-year plus history - SpeedGuide.net TCP Optimizer.
The program can aid both the novice and the advanced user in tweaking related TCP/IP parameters in the Windows Registry, making it easy to tune your system to the type of Internet connection used. The tool uses advanced algorithms, and the bandwidth*delay product to find the best TCP Window for your specific connection speed.
While the app can get geeky, most people can load presets that are available.
Similar:
How to Improve Your Wireless Network Performance
How to See Your Network Adapter Speed in Windows 10
How to Download the Latest Drivers for Windows
How to Reset Network Settings in Windows 10
What is Windows Auto-Tuning?
How to Update Your Router Firmware
How to View and Reset Network Data Usage in Windows 10
How-To Reset TCP/IP or Internet Protocol
How-To Flush the Windows DNS Cache
How-To Reset Winsock on Windows 1087
comments powered by Disqus
