


How to Rename a Network Profile Name in Windows 10
By Timothy Tibbettson 06/29/2023 |
In this tutorial, we show you how to rename your ethernet or Wi-Fi connection name.
Your computer automatically connects to the network you first connect to, and you can rename the connection in the Registry Editor or Group Policy Editor because Windows does not have a visible setting to make the change.
Rename a Network Profile Name in RegEdit
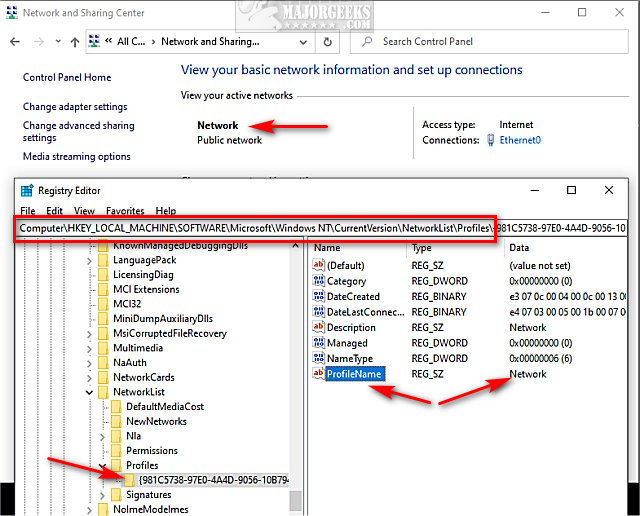
Open the Registry Editor and type the following into the search bar:
HKEY_LOCAL_MACHINE\SOFTWARE\Microsoft\Windows NT\CurrentVersion\NetworkList\Profiles
Click on the long GUID number and look for the ProfileName that matches the network name you are changing.
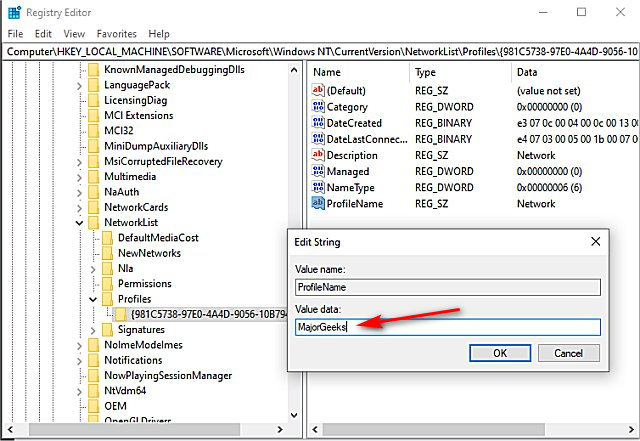
Double-click ProfileName.
Enter the new name in the Value data field. Note that you can't have tabs or special characters, including \ / : * ? < > |.
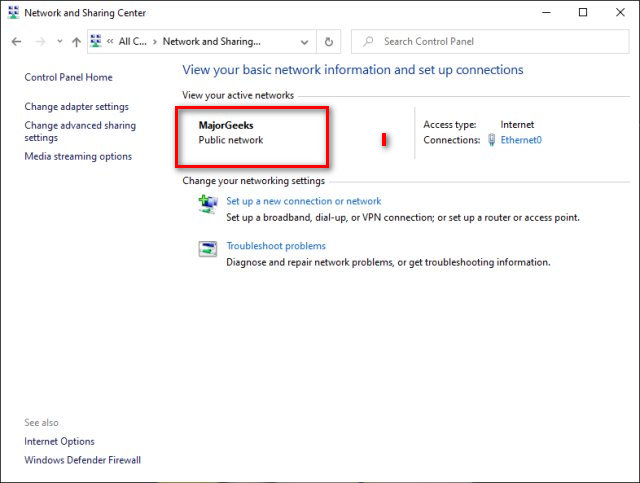
Your new Network name should appear the next time you check your Networks.
Rename a Network Profile Name in Local Security Policy
Local Security Policy is only available in Windows 10 Pro or Enterprise. You can add Group Policy Editor to Windows 10 Home, which in turn enables the Local Security Policy.
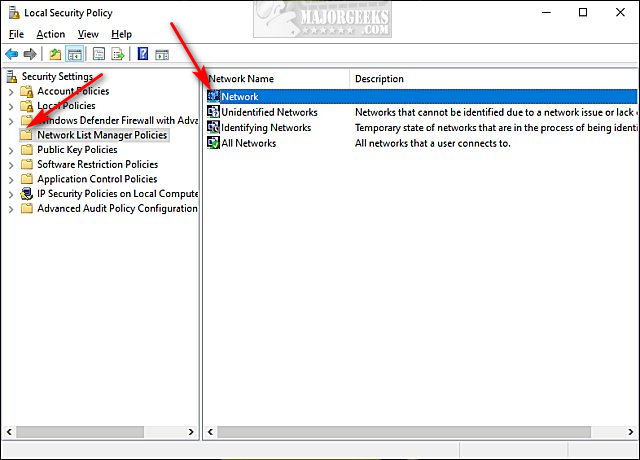
Press the Windows Key + R and type in secpol.msc and press Enter or OK.
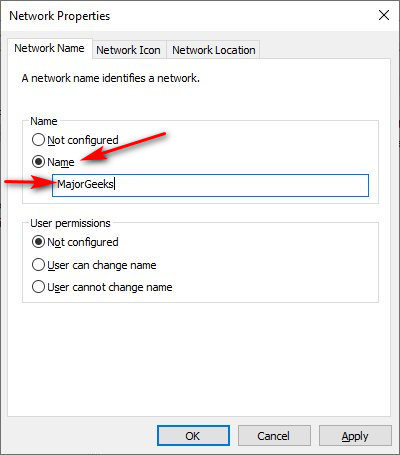
Click on Network List Manager Policies and double-click on your Network name. As you saw earlier, our current name is Network.
Under Name, click on Name.
Enter the desired network name and click on OK.
Your new Network name should appear the next time you check your Networks.
Similar:
3 Ways to Delete a Wireless Network Profile in Windows 10
How to Hide Nearby Wi-Fi Connections From Your List of Networks
How to Change Preferred Band (2.4 GHz or 5 GHz) for Wireless Network Adapters
5GHz Wi-Fi Not Showing up in Windows
What is Windows Auto-Tuning?
How to Improve Your Wireless Network Performance
How to Fix Slow Internet on Windows 10
Windows 10 Doesn't Connect to Wi-Fi on Startup
comments powered by Disqus
Your computer automatically connects to the network you first connect to, and you can rename the connection in the Registry Editor or Group Policy Editor because Windows does not have a visible setting to make the change.
Rename a Network Profile Name in RegEdit
Open the Registry Editor and type the following into the search bar:
HKEY_LOCAL_MACHINE\SOFTWARE\Microsoft\Windows NT\CurrentVersion\NetworkList\Profiles
Click on the long GUID number and look for the ProfileName that matches the network name you are changing.
Double-click ProfileName.
Enter the new name in the Value data field. Note that you can't have tabs or special characters, including \ / : * ? < > |.
Your new Network name should appear the next time you check your Networks.
Rename a Network Profile Name in Local Security Policy
Local Security Policy is only available in Windows 10 Pro or Enterprise. You can add Group Policy Editor to Windows 10 Home, which in turn enables the Local Security Policy.
Press the Windows Key + R and type in secpol.msc and press Enter or OK.
Click on Network List Manager Policies and double-click on your Network name. As you saw earlier, our current name is Network.
Under Name, click on Name.
Enter the desired network name and click on OK.
Your new Network name should appear the next time you check your Networks.
Similar:
comments powered by Disqus
