


How to View Wireless Network Signal Strength in Windows
By Timothy Tibbettson 06/28/2023 |
When diagnosing wireless problems, it's important to know your signal strength. In this tutorial, we look at different ways to see your Wi-Fi signal strength.
Video tutorial:
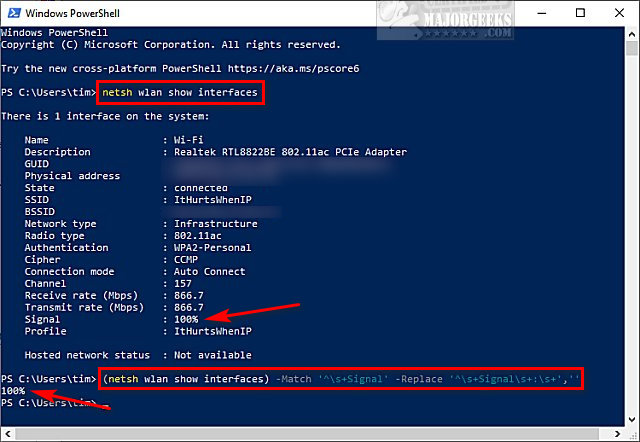
View Wireless Network Signal Strength in Windows 10 in PowerShell or Command Prompt
It's important to note that most of the time when you view your signal strength, the results are displayed as "bars." Typically, there are 3-5 bars, and those results are generic. By using the Command Prompt, you can get an exact percentage, and it's the best way to get an accurate number.
Open the Command Prompt or PowerShell and type in the following:
Command Prompt:
netsh wlan show interfaces
PowerShell:
netsh wlan show interfaces or
(netsh wlan show interfaces) -Match '^s+Signal' -Replace '^s+Signals+:s+',''
View Wireless Network Signal Strength in Windows 10 in Taskbar
Everyone should know you can look in the lower right corner of your screen. More bars means a better signal.
If you click the wireless icon, you can see the strength of multiple Wi-Fi connections, if applicable.
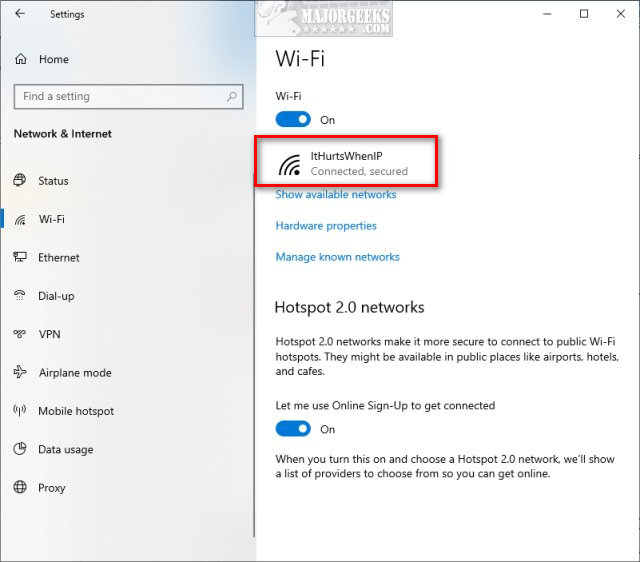
View Wireless Network Signal Strength in Windows 10 in Settings
Click Start > Settings > Network & Internet. Click on Wi-Fi or Status. Your connection appears near the top center.
View Wireless Network Signal Strength in Windows 10 in Control Panel
Open the Control Panel and click on Network and Sharing Center.
You can see your Wi-Fi strength under View your active networks or click on your connection for a better view of the bars.
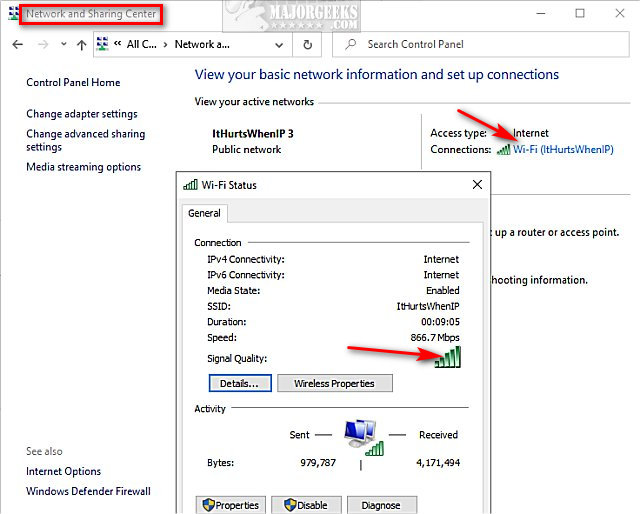
You can also click on Change Adapter Settings for a different view.
Similar:
How to Improve Your Wireless Network Performance
How to Show Your Internet Upload, Download, and Usage on the Taskbar
How to See Your Network Adapter Speed in Windows 10
What is Windows Auto-Tuning?
How to Check Wi-Fi Security Settings in Windows
3 Ways to Delete a Wireless Network Profile in Windows 10
How to Hide Nearby Wi-Fi Connections From Your List of Networks
comments powered by Disqus
View Wireless Network Signal Strength in Windows 10 in PowerShell or Command Prompt
It's important to note that most of the time when you view your signal strength, the results are displayed as "bars." Typically, there are 3-5 bars, and those results are generic. By using the Command Prompt, you can get an exact percentage, and it's the best way to get an accurate number.
Open the Command Prompt or PowerShell and type in the following:
Command Prompt:
netsh wlan show interfaces
PowerShell:
netsh wlan show interfaces or
(netsh wlan show interfaces) -Match '^s+Signal' -Replace '^s+Signals+:s+',''
View Wireless Network Signal Strength in Windows 10 in Taskbar
Everyone should know you can look in the lower right corner of your screen. More bars means a better signal.
If you click the wireless icon, you can see the strength of multiple Wi-Fi connections, if applicable.
View Wireless Network Signal Strength in Windows 10 in Settings
Click Start > Settings > Network & Internet. Click on Wi-Fi or Status. Your connection appears near the top center.
View Wireless Network Signal Strength in Windows 10 in Control Panel
Open the Control Panel and click on Network and Sharing Center.
You can see your Wi-Fi strength under View your active networks or click on your connection for a better view of the bars.
You can also click on Change Adapter Settings for a different view.
Similar:
How to Improve Your Wireless Network Performance
How to Show Your Internet Upload, Download, and Usage on the Taskbar
How to See Your Network Adapter Speed in Windows 10
What is Windows Auto-Tuning?
How to Check Wi-Fi Security Settings in Windows
3 Ways to Delete a Wireless Network Profile in Windows 10
How to Hide Nearby Wi-Fi Connections From Your List of Networks
comments powered by Disqus
